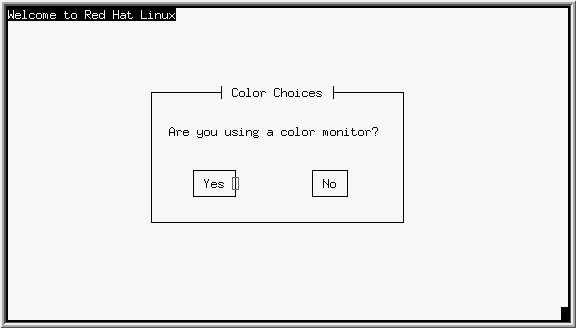
To begin installing Red Hat Linux, insert the boot floppy you just created into the floppy drive and reboot the machine (if you have MS-DOS installed on your machine, you can start installing directly from the CD-ROM; see Section 2.3.1.3 above). The boot: prompt appears; press [Enter] to boot. Watch the boot messages to see whether the Linux kernel detects your hardware. If it does not properly detect your hardware, you may need to reboot and enter some options at the boot: prompt, e.g.:
boot: linux hdc=cdrom
Press [Enter] to boot using those options. If you do need to specify some boot options, please make note of them; they will be needed later.
Please Note: Because Red Hat Linux supports installation on many different types of hardware, many drivers (including those for SCSI adapters, network cards, and many CD-ROMs) are not built into the Linux kernel used during installation; rather, they are available as modules and loaded as you need them during the installation process. You will have the chance to specify options for such drivers at the time they are loaded, and in fact these drivers will ignore any options you specify for them at the boot: prompt. Please see Section 2.2.2 above for more information about drivers built into the installation system.
After booting, the installation process begins by asking if you are using a color monitor (see Figure 2). Yes is the default; if you can't distinguish a cursor or highlight press [Tab] once, and then [Enter] to proceed. Next it presents a welcome message; press [Enter] to begin the installation. If you wish to abort the installation process, you may simply eject the boot floppy now and reboot your machine.

After the welcome dialog, the installation program gives you an opportunity to select a keyboard map (see Figure 3). Select the keymap you wish to use on your Red Hat Linux system and press [Enter]; the keymap you select will be loaded automatically both for the remainder of the installation process and each time you boot your Red Hat Linux system.
If you wish to change your keymap after you have booted your Red Hat Linux system, you may use the /usr/sbin/kbdconfig command.

Next, the installation program asks you whether you need PCMCIA support. If you are using a PCMCIA device for installation (for example, a PCMCIA ethernet card for installing via NFS, or PCMCIA SCSI card for installing from CD) you should answer Yes; the installation program prompts you to insert the supplemental diskette. You should wait until the next dialog appears before inserting your PCMCIA card.
You can install Red Hat Linux via any of four basic methods (see Section 2.2.1, Installation Methods), some of which require the use of a supplemental diskette. To summarize:
The next dialog asks what type of installation method you wish to use (see Figure 4). Highlight the appropriate choice and select OK, or press [Enter]. If you select FTP, or hard drive, and you're not using PCMCIA support, the installation program prompts you to insert the supplemental diskette.
If you choose to install Red Hat Linux/Intel from CD-ROM, the installation program prompts you for the type of CD-ROM:

If you are not installing Red Hat Linux via NFS, you may skip to Section 2.4.6 below.
If you are installing via NFS, you must have a supported network card installed in your computer. The installation program prompts you to choose the driver that supports your network card and to specify any options necessary for the driver to locate and recognize the card. Most of the time, the driver can locate the card automatically by probing; however, it is possible that probing your hardware might cause your machine to hang. If this happens, reboot the machine, start the installation again, and specify additional driver options when you get to this step (see Appendix A).
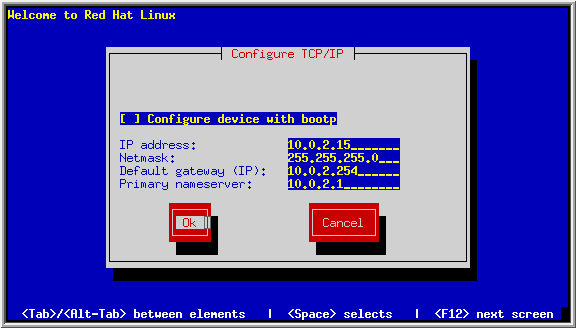
After the installation program has found your network card, it presents several dialogs for configuring TCP/IP networking. This information is only used during the installation process; you will be able to configure permanent networking information later. This feature allows greater flexibility if you want to install from a network other than the one where the machine will ``live''. Figure 5 contains example networking information.
| Field | Example Value |
| IP Address | 10.0.2.15 |
| Netmask | 255.255.255.0 |
| Default Gateway | 10.0.2.254 |
| Primary Nameserver | 10.0.2.1 |
| Domain Name | redhat.com |
| Hostname | pooh.redhat.com |
The first dialog asks you for IP and other network addresses (see Figure 6). Enter the IP address you are using during installation and press [Enter]. The installation program attempts to guess your Netmask based on your IP address; you may change the netmask if it is incorrect. Press [Enter]. The installation program guesses the Default gateway and Primary nameserver addresses from your IP address and netmask; you may change them if they are incorrect. Choose OK to continue.
The second dialog prompts you for a domain name, a hostname, and other networking information (see Figure 7). Enter the Domain name for your system and press [Enter]; the installation program carries the domain name down to the Host name field. Enter the hostname you are using in front of the domain name to form a fully qualified domain name (FQDN). If your network has more than one nameserver, you may enter IP addresses for additional nameservers in the Secondary nameserver and Tertiary nameserver fields. Choose OK to continue.

The next dialog requests information about the NFS server (see Figure 8). Enter the name or IP address of your NFS server, and the name of the exported directory that contains the Red Hat Linux CD. For example, if the NFS server has the Red Hat Linux CD mounted on /mnt/cdrom, enter /mnt/cdrom in Red Hat directory. If the NFS server is exporting a mirror of the Red Hat Linux installation tree instead of a CD, enter the directory which contains the RedHat directory. For example, if your NFS server contains the directory /mirrors/redhat/i386/RedHat, enter /mirrors/redhat/i386.

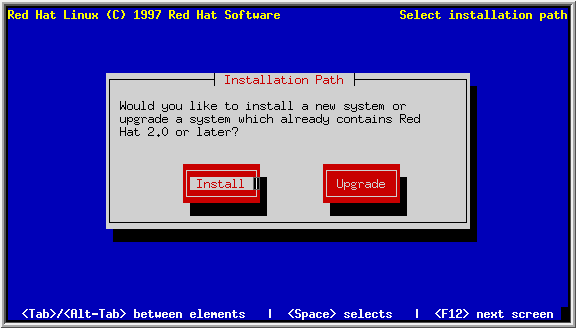
After you choose an installation method (and, if you're installing via NFS or SMB volume, after you configure networking information), the installation program prompts you to either install or upgrade (see Figure 9).
You usually install Red Hat Linux on a clean disk partition or set of partitions, or over another installation of Linux. Installing Red Hat Linux over another installation of Linux (including Red Hat Linux) does not preserve any of the prior installation.
If you wish to perform a full install, choose Install.
The installation process for Red Hat Linux 4.2 includes the ability to upgrade from prior versions of Red Hat Linux (2.0, 2.1, 3.0.3, and 4.0) which are based on RPM technology. Upgrading your system installs the modular 2.0.x kernel as well as updated versions of the packages which are installed on your machine. The upgrade process preserves existing configuration files using a .rpmsave extenstion (e.g., sendmail.cf.rpmsave) and leaves a log telling what actions it took in /tmp/upgradelog. As software evolves, configuration file formats can change, so you should carefully compare your original configuration files to the new files before integrating your changes.
If you wish to upgrade your Red Hat Linux/Intel system, choose Upgrade.
Please Note: Some upgraded packages may ``depend'' on other packages which may not be installed on your system. The upgrade procedure takes care of these dependencies, but it may need to install additional packages in order to satisfy them.
After you choose whether to perform an upgrade or a full install, the installation program asks you whether you have any SCSI adapters. If you choose Yes, the following dialog presents a list of SCSI drivers. Choose the driver that most closely resembles your SCSI adapter. The installation program then gives you an opportunity to specify options for the SCSI driver you selected; most SCSI drivers detect your hardware automatically, however.
If you are not installing Red Hat Linux via FTP or via an SMB volume, you may skip to Section 2.4.9 below.
If you are installing via FTP or via an SMB volume, you must have a supported network card installed in your computer. The installation program prompts you to choose the driver that supports your network card and to specify any options necessary for the driver to locate and recognize the card. Most of the time, the driver can locate the card automatically by probing; however, it is possible that probing your hardware might cause your machine to hang. If this happens, reboot the machine, start the installation again, and specify additional driver options when you get to this step (see Appendix A).
After the installation program has found your network card, it presents several dialogs for configuring TCP/IP networking. This information is only used during the installation process; you will be able to configure permanent networking information later. This feature allows greater flexibility if you want to install from a network other than the one where the machine will ``live''. Figure 5 contains example networking information.
The first dialog asks you for IP and other network addresses (see Figure 6). Enter the IP address you are using during installation and press [Enter]. The installation program attempts to guess your Netmask based on your IP address; you may change the netmask if it is incorrect. Press [Enter]. The installation program guesses the Default gateway and Primary nameserver addresses from your IP address and netmask; you may change them if they are incorrect. Choose OK to continue.
The second dialog prompts you for a domain name, a hostname, and other networking information (see Figure 7). Enter the Domain name for your system and press [Enter]; the installation program carries the domain name down to the Host name field. Enter the hostname you are using in front of the domain name to form a fully qualified domain name (FQDN). If your network has more than one nameserver, you may enter IP addresses for additional nameservers in the Secondary nameserver and Tertiary nameserver fields. Choose OK to continue.
If you're installing via FTP, the next dialog requests information about the FTP server (see Figure 10). Enter the name or IP address of the FTP site you are installing from, and the name of the directory there which contains the RedHat directory for your architecture. For example, if the FTP site contains the directory /pub/mirrors/redhat/i386/RedHat, enter /pub/mirrors/redhat/i386. If you are not using anonymous FTP, or if you need to use a proxy FTP server (if you're behind a firewall, for example), another dialog requests the FTP account or proxy information.

If you're installing via SMB volume, the next dialog requests information about the SMB server (see Figure 11). Enter the name or IP address of your SMB server, the name of the shared volume which contains the Red Hat Linux CD, and the account name and password for the volume.

After choosing whether to use SCSI support (and, if you're installing via FTP, after you configure networking information), the installation program presents a list of the hard disks it can find on your system and prompts you to set aside at least one disk partition for Red Hat Linux. If you need to create one or more partitions, select the disk you wish to partition and press [Enter]; the installation program starts the Linux fdisk utility. Please see Section 2.2.3 for recommendations about partitions for Red Hat Linux.
fdisk includes online help which is terse but useful. Here are a few tips:
Linux refers to disk partitions using a combination of letters and numbers which may be confusing to inexperienced users. Here is a summary:
When you are finished partitioning your disks, press Done; you may see a message indicating that the installation program needs to reboot. This is a normal occurrence after changing a disk's partition data; it usually happens if you created, changed, or deleted any extended partitions. After you press OK, your machine will reboot. Follow the same installation steps you did up until Partitioning Disks; then simply choose Done.
After creating partitions for Red Hat Linux, the installation program looks for swap partitions. If it finds any, it asks whether you want to initialize them. Select the partition(s) you wish to initialize as swap space using [Space]; if you wish to check the partitions for bad blocks, make sure the Check for bad blocks during format box is checked. Choose OK.
If the installation program can't find your swap partition, make sure you have set the partition type to Linux swap; see Section 2.4.9 above.
Since Red Hat Linux may be distributed across several disk partitions, you need to choose which disk partitions go with which filesystem.
If you are performing a full install, the installation program presents a list of the Linux partitions it can find and prompts you to choose a root partition. The root partition (or root filesystem) is the one which holds everything necessary to boot your Red Hat Linux system; it is mounted on / (the root directory) when your system boots. Select the root partition you wish to use and press [Enter].
If you are performing an upgrade, the installation program tries to find your root partition automatically; if it finds one, it goes on to the next step.
The next dialog presents a list of most of the disk partitions on your system (including MS-DOS and other partitions Linux can read), giving you the opportunity to assign other partitions to different parts of the filesystem. The partitions you assign will be automatically mounted when your Red Hat Linux system boots. Select the partition you wish to assign and press [Enter] (or choose Edit); then enter the mount point for that partition, e.g., /usr (see Figure 12).

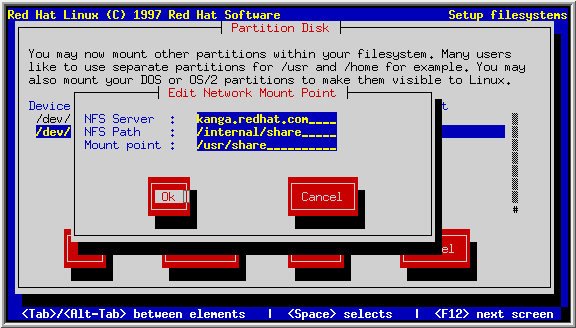
Additionally, Red Hat Linux allows you to mount NFS volumes when your system boots; this allows directory trees to be shared across a network. Choose Add NFS; then enter the hostname of the NFS server, the path to the NFS volume, and the local mount point for that volume (see Figure 13).
The next installation dialog presents a list of partitions to format. Most partitions should be formatted, especially if they are newly created; however, partitions such as /home or /usr/local do not need to be formatted if they contain data you wish to keep. Select each partition to format and press [Space]. If you wish to check for bad blocks while formatting each filesystem, select Check for bad blocks during format. Press OK.
After your partitions are configured and formatted, you are ready to select packages to install. You can select system components, which group packages together according to function, select individual packages, or select a combination of the two.
System components group packages together according to the function your Red Hat Linux system should be able to perform: for example, C Development, Networked Workstation, or Web Server. Select each component you wish to install and press [Space]. Selecting Everything installs all packages included with Red Hat Linux (see Figure 14).
If you wish to select or deselect individual packages as well as system components, choose Select individual packages.
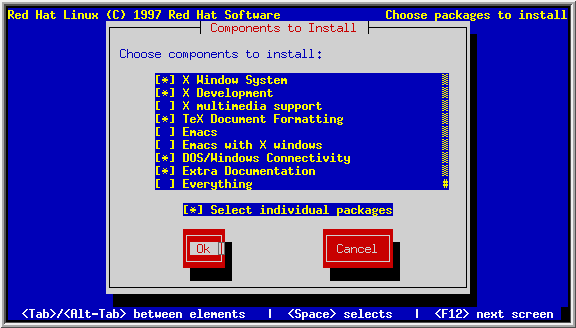
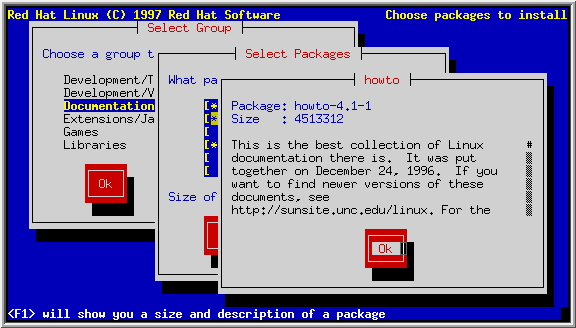
After selecting the components you wish to install, you may select or deselect individual packages. The installation program presents a list of the package groups available; select a group to examine and press [Enter]. The installation program presents a list of the packages in that group, which you may select or deselect using [Space]. You may view a detailed description of a package by pressing [F1] (see Figure 15). When you are finished selecting individual packages, press OK in the Select Group dialog.
Please Note: Some packages (such as the kernel and certain libraries) are required for every Red Hat Linux system and are not available to select or deselect.
Many software packages, in order to work correctly, depend on other software packages or libraries to be installed on your system. For example, many of the graphical Red Hat system administration tools require the python and pythonlib packages. To make sure your system has all the packages it needs in order to be fully functional, Red Hat Linux checks dependencies each time you install or uninstall software packages.
After you have finished selecting packages to install, the installation program checks the list of selected packages for dependencies. If any package requires another package which you have not selected to install, the program presents a list of these unresolved dependencies and gives you the opportunity to resolve them (see Figure 16). If you simply press OK, the program will resolve them automatically by adding all required packages to the list of selected packages.

After all package dependencies are resolved, the installation program begins to install packages; it leaves a complete log of what it installs in /tmp/install.log on your Red Hat Linux system.
To configure your mouse, choose the mouse type that best matches your mouse and press [Enter]. If you have a 2 button mouse and want to emulate the third (middle) button by clicking the left and right buttons at the same time, choose Emulate 3 Buttons.
If you choose a serial mouse, the next dialog prompts you for the serial (COM) port your mouse is connected to. Choose the correct port and press [Enter].
Please Note: If your mouse is connected to a PS/2 mouse port, you should select PS/2 Mouse, no matter what kind of mouse it is.
If you wish to change your mouse configuration after you have booted your Red Hat Linux system, you may use the /usr/sbin/mouseconfig command.
After setting up your mouse, if you installed the X Windows packages, you have the opportunity to configure your X server. If you did not choose to install the X Window System, you may skip to Section 2.4.15 below.
If you are installing from an Official Red Hat Linux/Intel CD, you may install one copy of MetroLink's Metro-X server, a high-quality commercial X server for Linux. Please see the MetroLink license (paper copy) accompanying your Red Hat Linux CD for license information. If you choose to use Metro-X, the install program launches the Metro-X configuration utility configX; please see Chapter 5, Section 5.3 for more information on how to use configX.
If you wish to use XFree86 (because Metro-X may not support your video card, because you have already installed Metro-X on another machine, because Metro-X was not included with your copy of Red Hat Linux/Intel, or because you simply prefer to use XFree86), the install program launches the Xconfigurator utility, which is described in detail in Chapter 5, Section 5.2.
Xconfigurator first presents a list of video cards. Select your video card from the list and press [Enter]. If your video card does not appear on the list, XFree86 may not support it; however, if you have technical knowledge about your card, you may choose Unlisted Card and attempt to configure it anyway.
Once you have selected your video card, the installation program installs the appropriate XFree86 server, and Xconfigurator presents a list of monitors. If your monitor appears on the list, select it and press [Enter]. Otherwise, select Custom. If you do select Custom, Xconfigurator prompts you to select the horizontal sync range and vertical sync range of your monitor (these values are generally available in the documentation which accompanies your monitor, or from your monitor's vendor or manufacturer).
Please Note: It is not recommended to select a monitor ``similar'' to your monitor unless you are certain that the monitor you are selecting does not exceed the capabilities of your monitor. If you do so, it is possible you may overclock your monitor and damage or destroy it.
Next, Xconfigurator prompts you for the amount of video memory installed on your video card. If you are not sure, please consult the documentation accompanying your video card. It ought not to damage your video card by choosing more memory than is available, but the XFree86 server may not start correctly if you do.
If the video card you selected might have a video clockchip, Xconfigurator presents a list of clockchips. The recommended choice is No Clockchip Setting, since XFree86 can automatically detect the proper clockchip in most cases.
Finally, Xconfigurator prompts you to select the video modes you wish to use; select one or more modes by pressing [Space]. Xconfigurator then writes a configuration file containing all of your choices to /etc/X11/XF86Config.
After assisting you in configuring an X server, the installation program gives you an opportunity to configure (or reconfigure) networking. If you are installing from CD-ROM or from a local hard disk, the installation program asks if you want to configure networking. If you choose No, your Red Hat Linux system will be a standalone workstation. If you choose Yes, you may configure networking as described below.
If you are installing Red Hat Linux via NFS or FTP, you will have already configured temporary networking information. The install program offers you three choices:
After the installation program has found your network card, it presents several dialogs for configuring your sytem's permanent TCP/IP networking. This feature allows greater flexibility if you want to install from a network other than the one where the machine will ``live''. Figure 5 contains example networking information.
The first dialog asks you for IP and other network addresses (see Figure 6). Enter the IP address you are using during installation and press [Enter]. The installation program attempts to guess your Netmask based on your IP address; you may change the netmask if it is incorrect. Press [Enter]. The installation program guesses the Default gateway and Primary nameserver addresses from your IP address and netmask; you may change them if they are incorrect. Choose OK to continue.
The second dialog prompts you for a domain name, a hostname, and other networking information (see Figure 7). Enter the Domain name for your system and press [Enter]; the installation program carries the domain name down to the Host name field. Enter the hostname you are using in front of the domain name to form a fully qualified domain name (FQDN). If your network has more than one nameserver, you may enter IP addresses for additional nameservers in the Secondary nameserver and Tertiary nameserver fields. Choose OK to continue.
After you have set up networking, the installation program asks whether you would like to configure a printer. If you choose Yes, a series of dialogs will assist you in configuring your printer. The following information applies to all printers:
Local printers also require the following information:
Remote LPD printers also require the following information:
When you have finished configuring a printer, the installation program will ask you to confirm the choices you made. After you confirm them, you may configure another printer, or you may continue with the installation.
Next, the installation program presents a dialog to help you configure your Red Hat Linux system's timezone.
If you wish to set the hardware (CMOS) clock to GMT (Greenwich Mean Time, also known as UTC, or Coordinated Universal Time), select Hardware clock set to GMT. Setting your hardware clock to GMT means your Red Hat Linux system will properly handle daylight savings time, if your timezone uses it. Most networks use GMT.
Select the timezone your system will be operating in from the list, and press [Enter].
If you wish to change your timezone configuration after you have booted your Red Hat Linux system, you may use the /usr/sbin/timeconfig command.
After you have set up your system's timezone, the installation program prompts you to set a root password for your system; this is the password you will use to log into your Red Hat Linux system for the first time.
The root password must be at least six characters long; the password you type is not echoed to the screen. You must enter the password twice; if the two passwords do not match, the installation program will ask you to enter them again. You ought to make the root password something you can remember, but not something that is easy for someone else to guess. Your name, your phone number, qwerty, password, root, 123456, and anteater are all examples of poor passwords. Good passwords mix numerals with upper and lower case letters and do not contain dictionary words: Aard387vark or 420BMttNT, for example. Remember that the password is case-sensitive. Write down this password and keep it in a secure place.
Please Note: The root user (also known as the superuser) has complete access to the entire system; for this reason, logging in as the root user is best done only to perform system maintenance or administration, so that critical system files are not inadvertently changed, moved, or deleted. Please see Section 8.1 for instructions on how to add a user for yourself after you reboot your system.
In order to be able to boot your Red Hat Linux system, you usually need to install LILO (the LInux LOader). You may install LILO in one of several places:
Select the location you wish to install LILO and press OK. If you do not wish to install LILO, press Skip.

LILO is subject to some limitations imposed by most PC BIOSes. Specifically, most BIOSes can't access more than two hard drives and they can't access beyond cylinder 1023 (the 1024th cylinder) of any drive. Some more recent BIOSes do not have these limitations.
All the things which LILO needs to access at boot time (including the kernel) are located in the /boot directory of your root partition.
Here are the ``rules'' of where /boot must live if you want to install LILO on a hard drive:
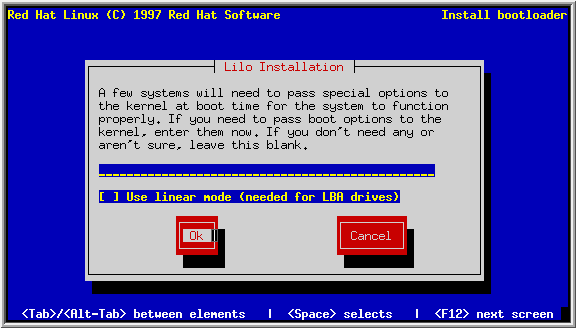
Finally, the installation program will ask if you wish to add default options to the LILO boot command. Any options you enter will be passed to the Linux kernel every time it boots. If you have an LBA drive, check Use linear mode. Press OK when finished.
If you do not wish to use LILO to boot your Red Hat Linux system, there are a few alternatives:
After you have completed LILO installation, the installation program will reboot your system. Please don't forget to remove the installation floppy from the diskette drive.
At the boot: prompt, press [Enter] and watch your Red Hat Linux system boot. When it presents the login: prompt, enter root; at the Password: prompt, type the root password you set for your machine in Section 2.4.18.