4. Post Installation Configuration and Installation Troubleshooting
Once the PC-BSD® system has finished booting for the first time, the installer will present you with some additional screens so that you can configure your system. This section describes the boot process, the post-installation configuration screens, and provides some troubleshooting tips for failed installations.
4.1. Booting Into PC-BSD®
After installation, PC-BSD® will reboot and you will be prompted to configure your system and to login to a desktop.
Once the first boot is complete, the installer will attempt to set the optimal display settings. A pop-up menu will ask if you would like to accept these settings. Simply click “Yes” to continue. PC-BSD® will then proceed to the Language Screen.
Read through the rest of this section if you have encrypted your disk(s), your system hangs at boot time, or if you have problems setting the display settings. If you are dual booting and your other operating system was not automatically added to the graphical boot menu by the installer, refer to Dual Booting.
4.1.1. If you Encrypted Your Disks
If you selected the “Encrypt disk with GELI” checkbox during installation, you will need physical access to the PC-BSD® system when it boots. As the system starts to boot, it will display a message similar to the one shown in Figure 4.1a.
Figure 4.1a: Input Password to Decrypt Master Key
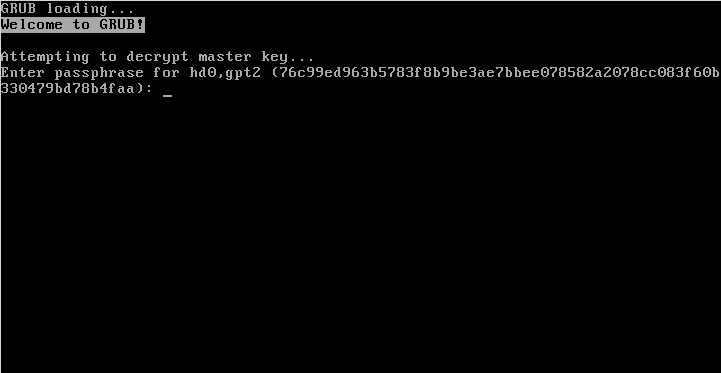
The boot process will wait for you to successfully input the password that you created in the installation screen shown in Figure 3.3g. If the correct password is typed in, the system will continue to boot.
4.1.2. Interrupting the Boot to Access the Boot Menu
By default, the graphical PC-BSD® bootloader menu shown in Figure 4.1b is not displayed at first boot.
Figure 4.1b: PC-BSD® Graphical Boot Menu
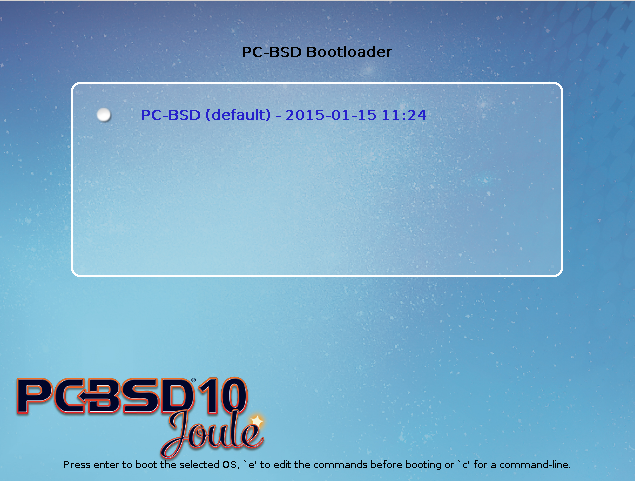
The boot menu is used to display the installation of PC-BSD®, any boot environments, and other operating systems installed on a dual-boot system.
To access this menu, you have to be quick. As soon as the boot process starts and you see a “GRUB loading” message in the upper left corner, press the left
Shift button. After the system boots, you can increase the timer value in Boot Manager if you find that the boot delay is too quick.
Once you access the graphical menu, it will pause for a few seconds then continue to boot PC-BSD®. If you wish to select a different operating system or specify how PC-BSD® boots, press a key to pause this screen. If multiple operating systems are available and you want to boot into PC-BSD®, make sure it is highlighted and press enter. This will load the PC-BSD® boot options screen shown in Figure 4.1c.
Figure 4.1c: PC-BSD® Graphical Boot Menu Options
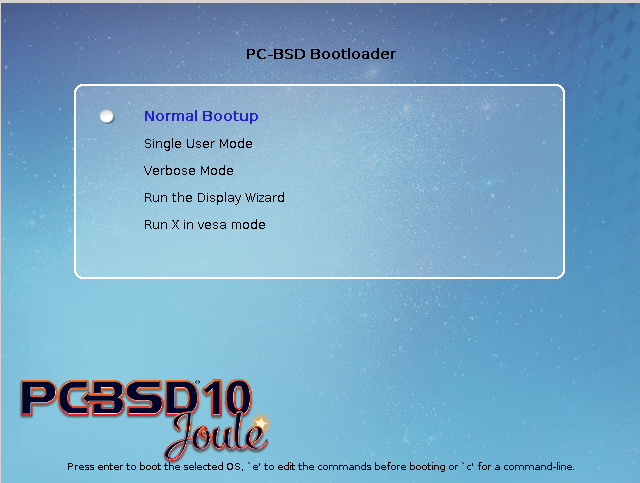
The following boot options are available:
- Normal Bootup: continues to boot PC-BSD®.
- Single User Mode: advanced users can select this option to fix critical system failures.
- Verbose Mode: select this option if you would like to see more detailed messages during the boot process. This can be useful if you are troubleshooting a piece of hardware.
- Run the Display Wizard: if you are unable to access the GUI due to a display setting, enable this option to boot into the display settings wizard.
- Run X in vesa mode: try this option if the screen goes black or the system freezes when booting into PC-BSD®.
Use the arrow keys to select an option then press enter to boot using that option.
This menu is provided by GRUB. If you are familiar with editing GRUB, you can press e to access the GRUB editor or c to access the GRUB command
line.
4.1.3. If Your Display is Not Automatically Detected
If the optimal display settings can not be determined during first boot, if you select “No”in the “Confirm Resolution” screen when asked to confirm the display settings, or if you select “Run the Display Wizard” from the boot menu, the “Display Settings” screen shown in Figure 4.1d will launch.
Figure 4.1d: Display Settings Wizard
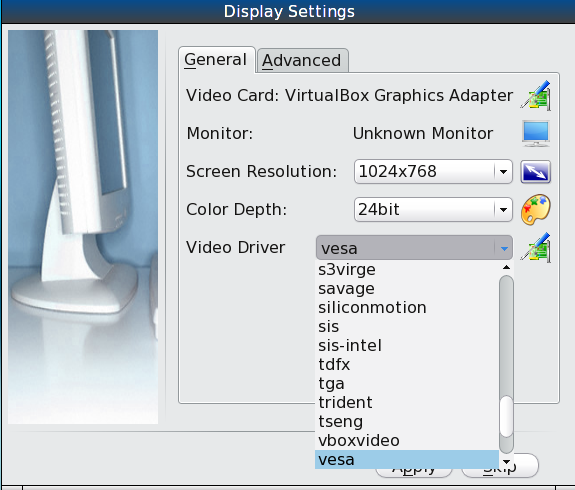
The settings in this screen are described in more detail in Display. If you wish to return to this display wizard at a later time, go to .
If you change any display settings, click the “Apply” button for the settings to be tested. If anything goes wrong during testing, you will be taken back to the “Display Settings” screen so that you can try another setting. Once you are happy with the tested setting, click the “Yes” button to save the setting and to proceed.
4.2. Language Screen
The language selection screen is seen in Figure 4.2a.
Figure 4.2a: Language Selection Screen
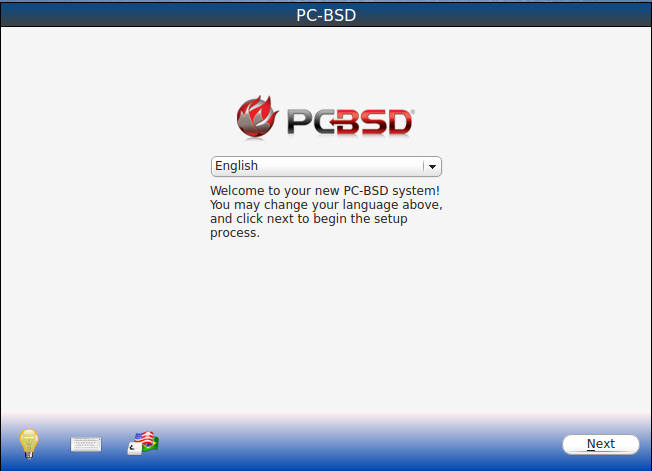
This allows you to select the language you will use to access the installed system.
Once you have made your selection from the drop-down menu, click “Next” to go to the next configuration screen.
4.3. Time Zone Selection Screen
The next configuration screen, shown in Figure 4.3a, allows you to select your timezone.
Figure 4.3a: Select Time Zone
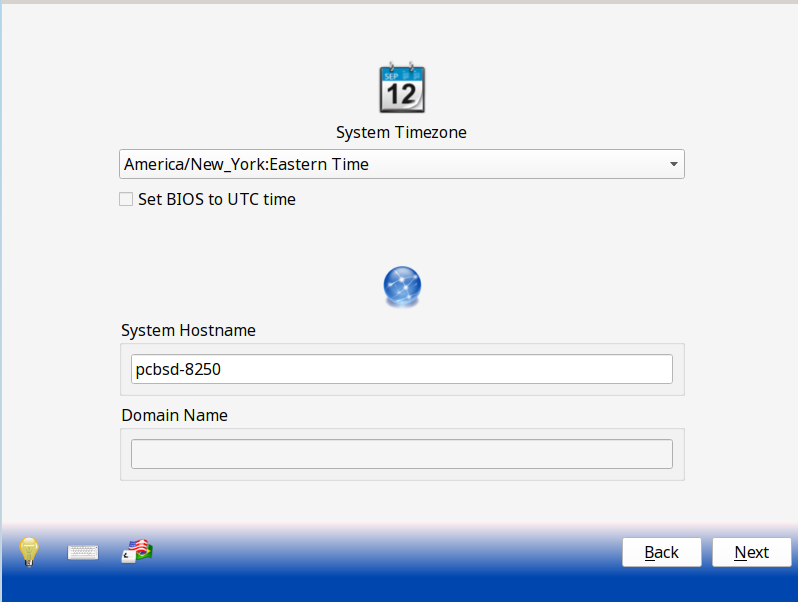
Use the drop-down menu to select the city closest to your location. If the system is connected to the Internet, the installer will most likely have the correct timezone already selected.
If the system is dual booting and the other operating system expects the BIOS to use UTC, also check the box “Set BIOS to UTC time”.
A default system hostname will be created for you. If you wish to change the default, type in the desired hostname in the “System Hostname” field. If the computer is a member of a DNS domain, you can also input the “Domain Name”.
When finished, click “Next” to proceed to the next screen.
4.4. Set Root Password Screen
This configuration screen, seen in Figure 4.4a, requires you to set the root password.
Figure 4.4a: Set Root Password
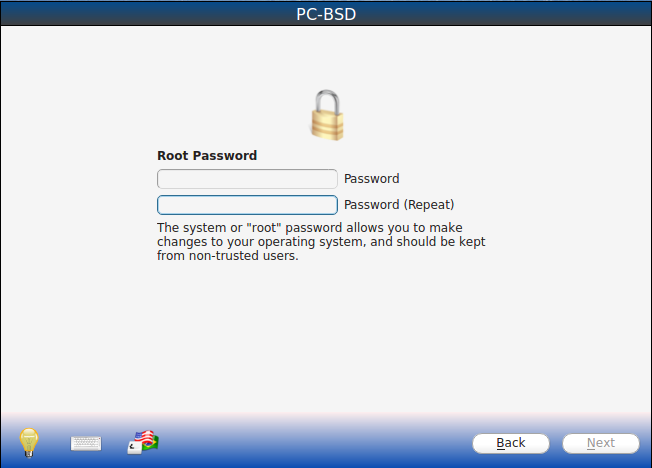
The password must be a minimum of 4 characters and you are required to type it in twice to confirm the password. Click the “Next” button when you are finished.
4.5. Create a User Screen
This screen is used to create the primary user account that will be used to login to the system. Set a good value for the password as it is used whenever the system indicates that administrative access is required.
Figure 4.5a shows the configuration screen used to create the initial user account.
Figure 4.5a: User Creation Screen
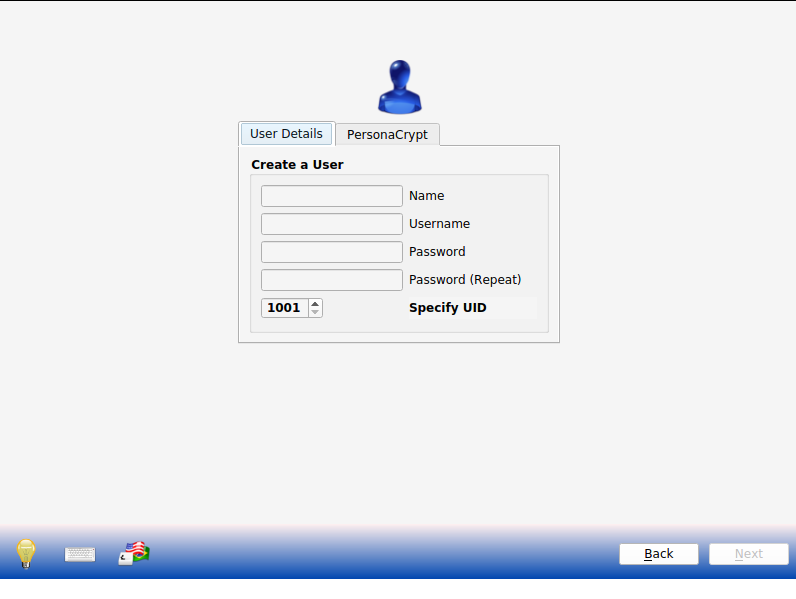
The “User Details” tab is used to create a login user. This screen requires you to complete the following fields:
- Name: this value will be displayed in the login screen. It can be your full name and can contain capital letters and spaces.
- Username: this is the name you will use when logging in. It can not contain spaces and is case sensitive (e.g. Kris is a different username than kris).
- Password: this is the password you will use when logging in. You must type it twice in order to confirm it.
- Specify UID: by default, the user will be assigned the next available User ID (UID). If you need to force a specific UID, you can set it here. Note that you cannot set a UID lower than 1001 or specify a UID that is already in use by another user account.
PC-BSD® provides the ability to use a removable device, such as a USB stick, as the user’s encrypted home directory. This is useful in a multi-user or multi-computer environment as it provides the user with secure access to their encrypted files. When a user is configured to use PersonaCrypt, their username will only appear in the login menu if the removable media associated with that PC-BSD® system is inserted and they must input the password associated with the removable device in order to login.
The “PersonaCrypt” tab, shown in Figure 4.5b, is used to initialize PersonaCrypt for the user.
Figure 4.5b: Initializing PersonaCrypt for this User
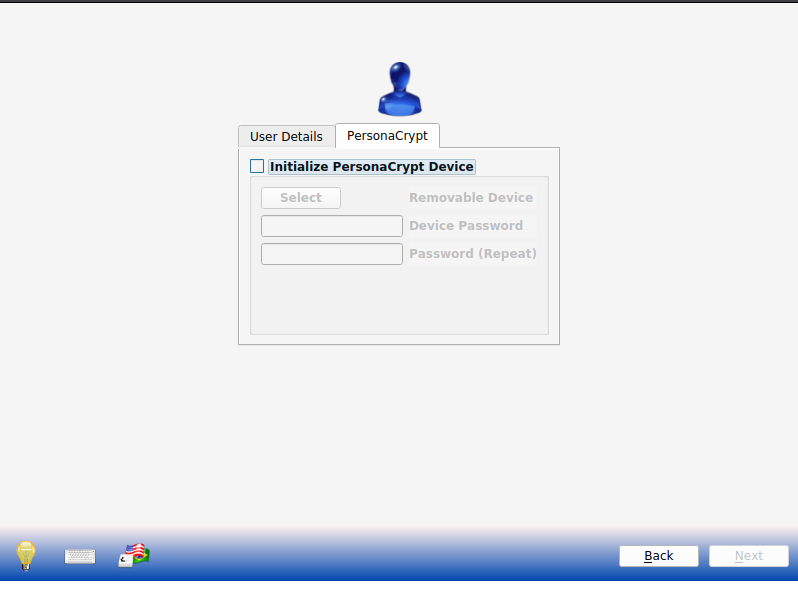
Check the box “Initialize PersonaCrypt Device”, insert a removable media that is large enough to hold the files you plan to store in your home directory, and click the “Select” button.
Warning
make sure you do not have any files that you wish to keep on the removable media. Initializing the media for PersonaCrypt will format the device with ZFS and encrypt it with GELI, meaning that any existing data will be destroyed.
Input and repeat the “Device Password” to associate with the device. A pop-up menu will indicate that the current contents of the device will be wiped. Click “Yes” to initialize the device.
If you share your computer with other users, you will be able to create additional login and PersonaCrypt accounts once you are logged in using . After you have created at least one user, click “Next” to continue to the next screen.
4.6. Configure Audio Output
The next screen, seen in Figure 4.6a, is used to configure the default audio output.
Figure 4.6a: Configure Audio Output
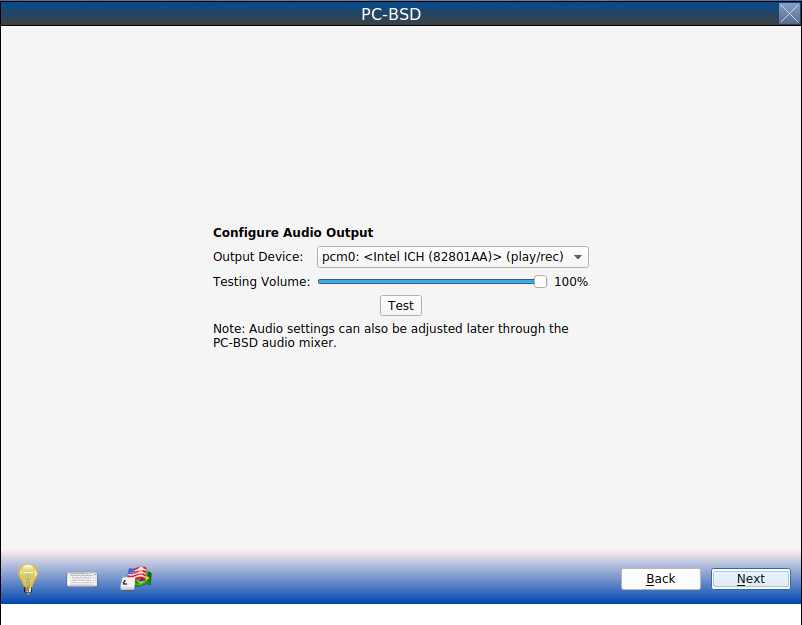
Click the “Output Device” drop-down menu to select the desired sound device. You can click the “Test” button to verify the setting as a working configuration will result in a test sound. You can also use the “Testing Volume” slider to set the default volume level.
You can view and edit these settings at a later time using the instructions in PC-BSD Mixer Tray.
4.7. Connect to a Wireless Network
If the system has an active wireless interface, a screen similar to Figure 4.7a will indicate the wireless networks which were automatically detected. Available networks will be ordered by signal strength.
Figure 4.7a: Connect to a Wireless Network
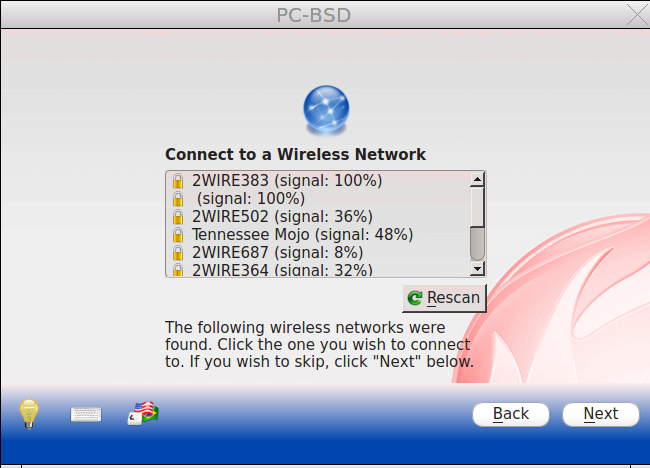
If you would like to set the default wireless connection, highlight the network that you would like to connect to. If the network requires a password, it will prompt you to input it and will indicate the type of security used on the network. If the network you wish to connect to does not appear, try clicking the “Rescan” button. If you are unable to connect, or you wish to configure the connection at a later time, refer to the instructions in Network Configuration.
4.8. Enable Optional Services
The next screen is shown in Figure 4.8a.
Figure 4.8a: Optional Services
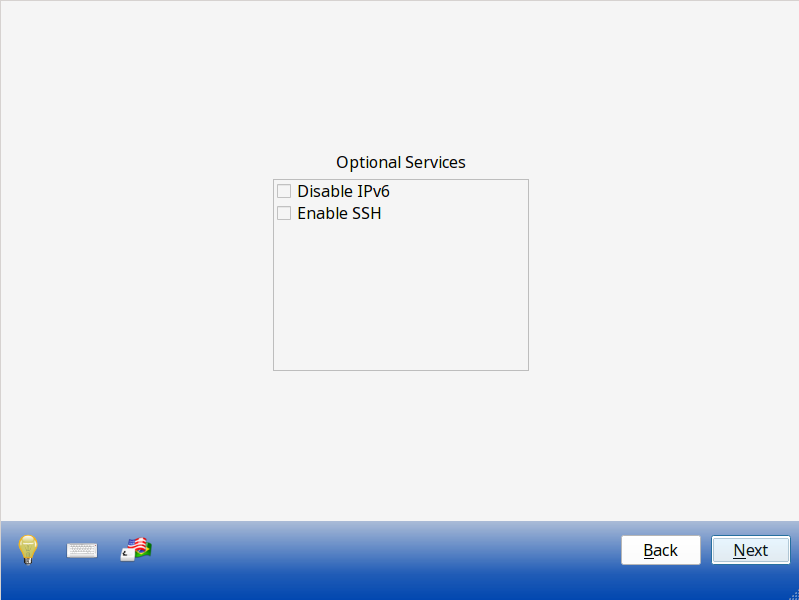
If you check the “Disable IPV6” box, the system will be configured to only support IPv4 addresses. The default is to support both IPv4 and IPv6 and to prefer IPv6 over IPv4.
If you check the “Enable SSH” box, the SSH service will start and be configured to start whenever the system boots. It will also create the firewall rules needed to allow incoming SSH connections to the PC-BSD® system. DO NOT check this box if you do not want to allow SSH connections to the system.
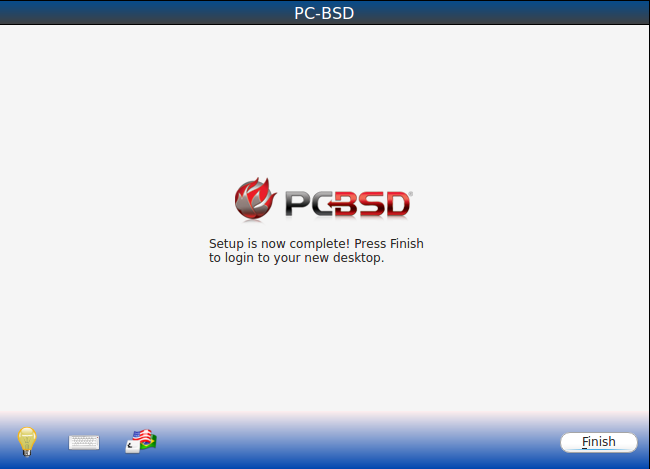
When finished, click the “Next” button. The screen in Figure 4.8b indicates that the post-installation setup is complete. Click the “Finish” button to access the login menu.
Figure 4.8b: Setup is Complete
4.9. Logging In
Once you have finished setting up your system, you will be presented with the PCDM (PC-BSD® Display Manager) graphical login screen. An example is seen in Figure 4.9a.
Figure 4.9a: PC-BSD® Login Screen
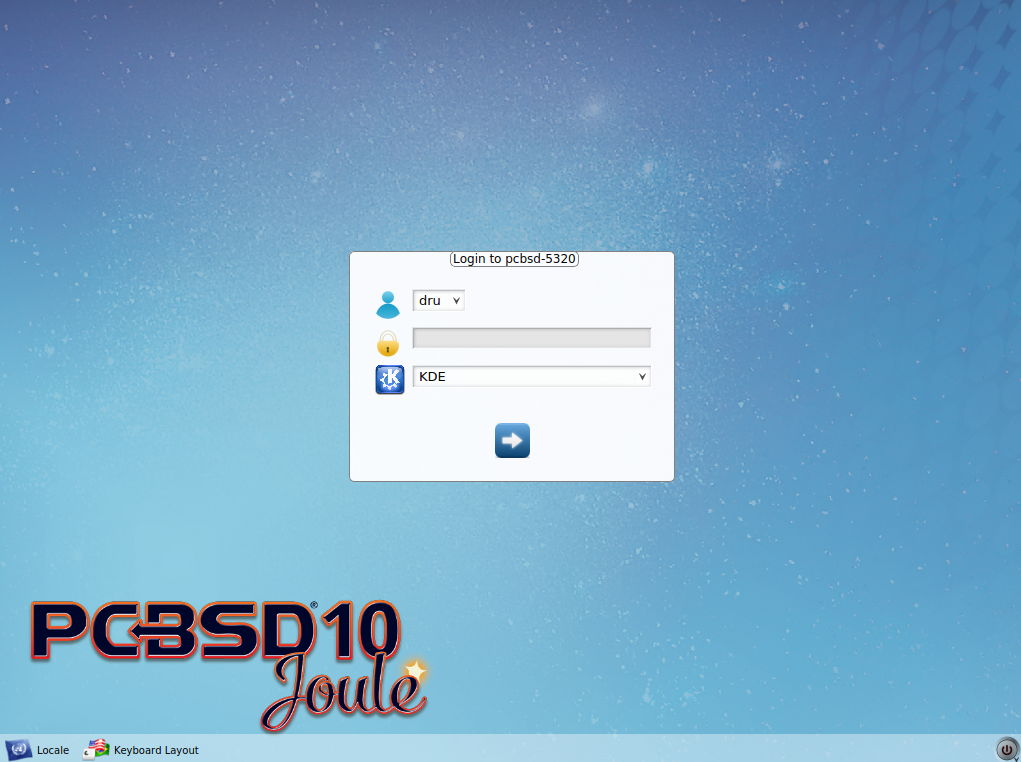
The hostname of the system will be displayed at the top of the login window. In this example, it is pcbsd-5320. The login window lets you select or input the following:
- user: the first time you login, the “Username” that you created in the Create a User Screen will be the only available user to login as. Later, if you create additional users using User Manager, they will be added to the drop-down menu so you choose which user to login as. PCDM will not let you login as the root user. Instead, whenever you access a utility that requires administrative access, PC-BSD® will first ask you to input the password of your login account.
- password: input the password associated with the selected user.
- desktop: if you installed any desktops, use the drop-down menu to select the desktop to log into. If you did not install any desktops, Fluxbox will be the only available desktop. You can install or uninstall desktops using AppCafe®.
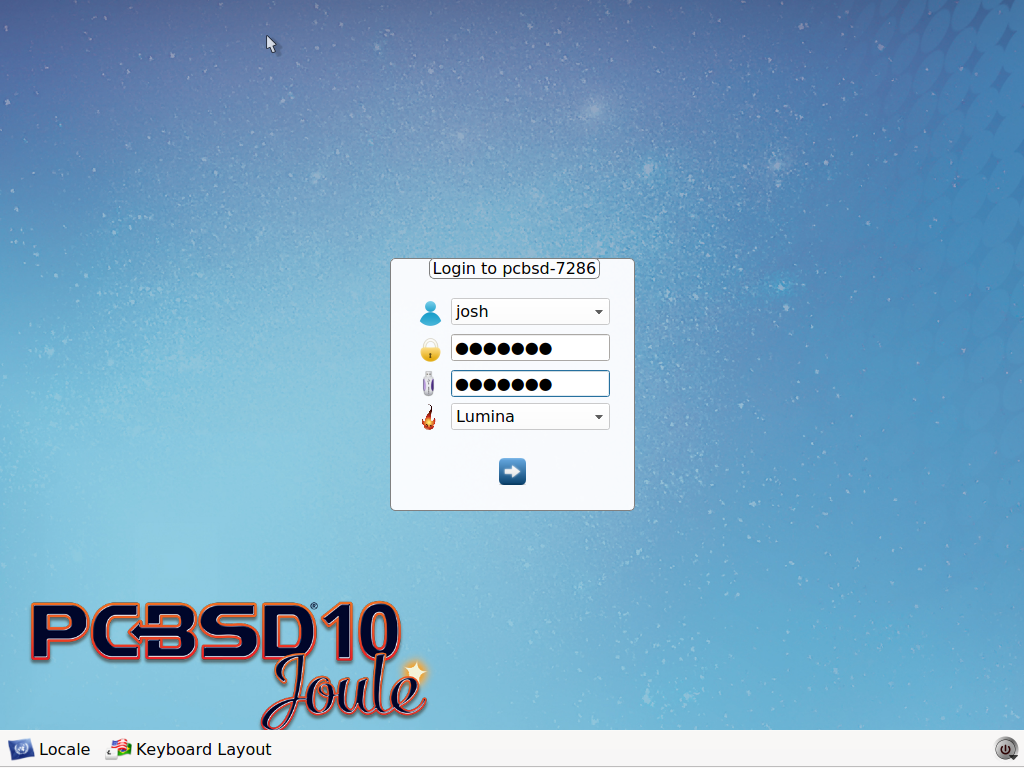
Note
if you created a PersonaCrypt user, you will need to insert the PersonaCrypt device in order to login. As seen in the example in Figure 4.9b, this will add an extra field to the login screen so that you can input the password associated with the PersonaCrypt device.
Figure 4.9b: PC-BSD® PersonaCrypt Login Screen
The toolbar at the bottom of the screen allows you to select the following options:
- Locale: if you did not set the localization during installation or wish to change it, click this icon to set the locale for the login session.
- Keyboard Layout: click this icon to change the keyboard layout for the login session.
- Restart/Shut Down: if you wish to restart or shutdown the system without logging in, click the icon in the lower, far right corner.
Once you have made your selections, input the password associated with the selected user and press enter or click the blue arrow icon to login.
The first time you log in, the PC-BSD® “Getting Started” screen will load as seen in Figure 4.9c.
Figure 4.9c: PC-BSD® Getting Started Screen
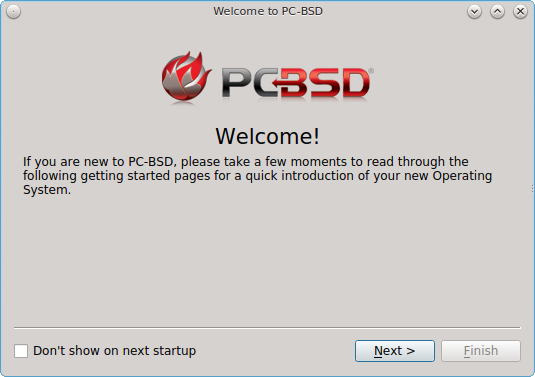
If you click the “Next” button, you can read an overview of the utilities that are used to configure your network connection, install applications, configure your system, make a backup, and keep the system updated, as well as how to get involved with the PC-BSD® community. Check the box “Don’t show on next startup” if you do not want to see this screen the next time you log in. To re-open the screen after checking that box, type pc-welcome.
4.10. Installation Troubleshooting
Installing PC-BSD® is usually an easy process that “just works”. However, sometimes you will run into a problem. This section will look at solutions to the most common installation problems.
The PC-BSD® installer creates a log which keeps a record of all the steps that are completed as well as any errors. When an installation error occurs, the PC-BSD® installer will ask if you would like to generate an error report. If you click “Yes”, a pop-up message will ask if you would like to save the error log to a USB stick. Type y and insert a FAT formatted USB thumb drive to copy the log.
While in the installer, you can read this log to see what went wrong. Right-click an area on the desktop outside of the installation window and select “xterm” from the menu. You can read the log with this command:
more /tmp/.SysInstall.log
If you can not figure out how to fix the error or believe that you have discovered an installation bug, send the log that was saved on the USB stick using the instructions in Report a bug.
If the installer does not make it to the initial GUI installer screen, try unplugging as many devices as possible, such as webcams, scanners, printers, USB mice and keyboards. If this solves the problem, plug in one piece of hardware at a time, then reboot. This will help you pinpoint which device is causing the problem.
If your computer freezes while probing hardware and unplugging extra devices does not fix the problem, it is possible that the installation media is corrupt. If the Data Integrity Check on the file you downloaded is correct, try burning the file again at a lower speed.
If the system freezes and you suspect the video card to be the cause, review your system’s BIOS settings. If there is a setting for video memory, set it to its highest value. Also check to see if the BIOS is set to prefer built-in graphics or a non-existent graphics card. On some systems this is determined by the order of the devices listed; in this case, make sure that the preferred device is listed first. If you can not see your BIOS settings you may need to move a jumper or remove a battery to make it revert to the default of built-in graphics; check your manual or contact your manufacturer for details.
If that change did not help, try rebooting and selecting the “Graphical Install (Failsafe VESA mode)” option from the boot menu shown in Figure 3a.
A not uncommon cause for problems is the LBA (Logical Block Addressing) setting in the BIOS. If your PC is not booting up before or after installation, check your BIOS and turn LBA off (do not leave it on automatic).
If the SATA settings in your BIOS are set to “compatibility” mode, try changing this setting to “AHCI”. If the system hangs with a BTX error, try turning off AHCI in the BIOS.
If the USB keyboard is non-functional, check if there is an option in your BIOS for “legacy support” in relation to the keyboard or to USB, or both. Enabling this feature in your BIOS may solve this issue.
If you boot the installer and receive a mountroot> command prompt, it may be due to a change in the location of the boot device. This can occur when the
if the enumeration of a card reader changes. The solution is to enter ufs:/dev/da1 at the prompt. Depending on
the exact location of the boot media, it may be different than da1. Type ? at the prompt to display the available devices.
If none of the above has fixed your problem, search the PC-BSD® forums to see if a solution exists, try a web search, or check the section on Finding Help.