3. Installing PC-BSD®
This chapter describes how to use the graphical installer to install a graphical desktop directly onto a hard drive or into a virtual machine using virtualization software such as VirtualBox. If you have downloaded the CD version of TrueOS® or prefer to use a text based installer, instead use the instructions in Using the Text Installer.
To begin the PC-BSD® installation, insert the prepared boot media and boot the system. If the computer boots into an existing operating system instead of the installer, reboot and check your computer’s BIOS program to ensure that the drive containing the installation media is listed first in the boot order. Save your BIOS changes and reboot.
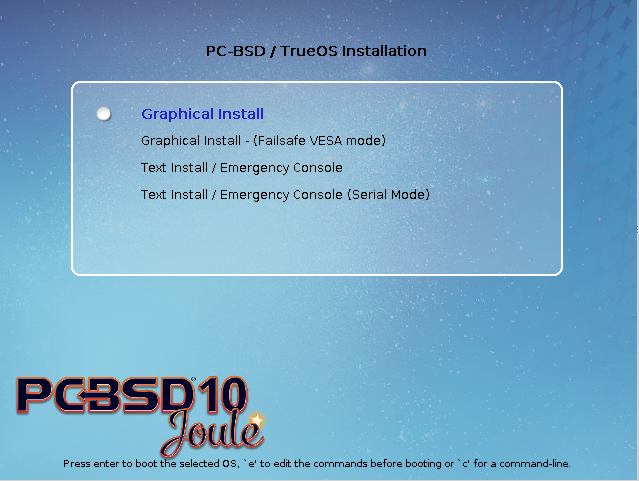
The initial boot screen, shown in Figure 3a, offers a choice of using either the graphical or the text based installer. Unless you select otherwise, the graphical installer will load. To instead use the text based installer, either from the console or over a serial connection, use the arrow keys to select an option. If the graphical installer hangs when loading the graphics driver, try selecting the VESA mode option of the graphical installer.
Figure 3a: PC-BSD® Installer Boot Menu
The rest of this chapter describes the screens of the graphical installer.
3.1. Language Selection Screen
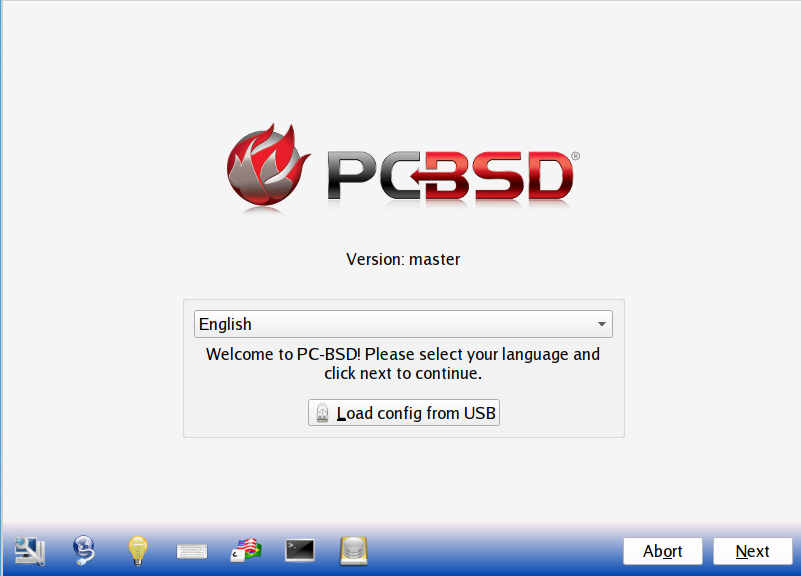
The first graphical installer screen, seen in Figure 3.1a, indicates that the installer successfully loaded and is ready to present you with its options.
Figure 3.1a: Welcome and Language Selection Screen
Starting on the left-hand side, the icons in the bottom navigation area allow you to:
- access Hardware Compatibility information
- manage Network Configuration for a network installation or system restore
- read that screen’s Help text
- use the onscreen keyboard
- switch between the US keyboard layout and a user selected layout
- access the emergency shell described in Using the System Utilities Menu
- access the Disk Manager utility
- abort the installation
- navigate to a previous or upcoming screen
Hover over an icon to view its description in the tip bar at the bottom of the screen.
Note
the default keyboard layout can be changed now, during the post-installation Language Screen, or when Logging In.
A button is also provided to “Load config from USB”. If you have saved the configuration from a previous installation, it can be loaded at this time from a FAT-formatted USB stick.
By default, PC-BSD® menus will display in English, unless you select another language in the drop-down menu in this screen. The menus in PC-BSD® have been translated to several different languages and you can see the status of your native language at the PC-BSD® Translation Site. If your language does not show 100% translation at this website, it means that not all of the menus have been translated yet and that the untranslated menus will be displayed in English. Refer to Become a Translator if you would like to assist in translating the graphical menus to your native language.
Note
small screens may not display the entire installer window, which means that the buttons at the bottom of the window are hidden and inaccessible.
There are two solutions for this situation: press Alt while dragging the window with the mouse, or press Alt+N to select the next button of
the window.
When you are finished reviewing this screen, click the “Next” button to go to the next installation screen.
3.2. System Selection Screen
The “System Selection” screen, shown in Figure 3.2a, allows you to install a desktop (PC-BSD®) or a server (TrueOS®) operating system. It also can be used for Restoring the Operating System. This chapter concentrates on a desktop installation. Refer to Install a Server for instructions on how to install a command-line only server.
Figure 3.2a: System Selection Screen
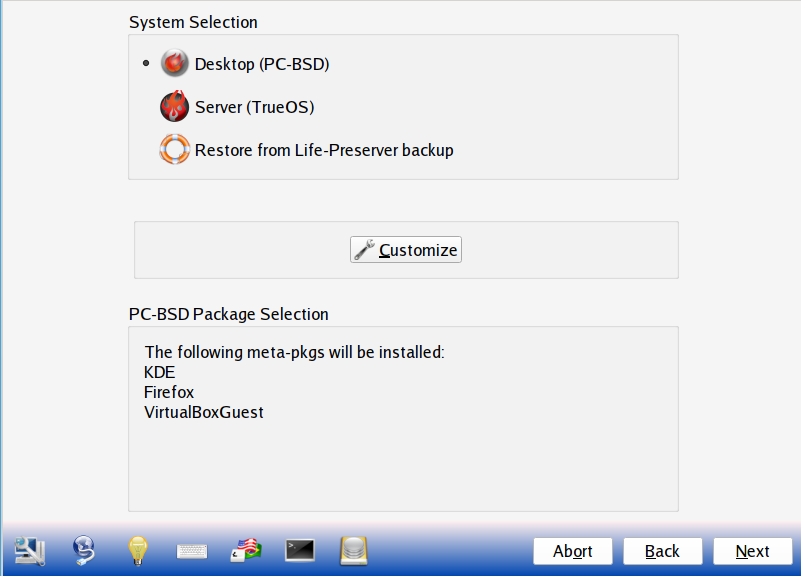
By default, PC-BSD® will be selected and the default window manager will depend upon the amount of RAM on the system. Systems containing more than 2GB of RAM will default to the KDE desktop and all other systems will default to the LXDE desktop. To change the default window manager or to browse for additional desktops and components to install, click the “Customize” button to open the screen shown in Figure 3.2b.
Figure 3.2b: Browsing Additional System Components

Check the ► next to a component in order to expand it so that you can check or uncheck its sub-components. All components that are checked will be installed. If you highlight then right-click a component and select “View Packages”, a pop-up menu will list the name of the packages that are installed with that component.
The following components are available for installation.
- Desktops: the following desktops are available: Awesome, Cinnamon, FVWM, GNOME, i3, IceWM, KDE4, Lumina, LXDE, MATE, Openbox, Ratpoison, spectrwm, WindowLab, Window Maker, and XFCE4. Each desktop that is selected will be installed and will appear in the login menu of the installed PC-BSD® system.
Note
even if you uncheck all desktops, Fluxbox is always installed and available in the login menu of a PC-BSD® system.
- Devel: check the box to install QGit.
- Drivers: if you have an NVIDIA video card, the correct driver should already be checked for you.
- Editors: check the box to install LibreOffice.
- Emulators: check the box to install VirtualBox.
- i18n: if you expand the ► you can select to install localization for for the KDE desktop and for the operating system.
- IRC: check the box to install HexChat.
- Java: if you expand the ► you can select to install IcedTea and OpenJDK versions 7 and 8.
- Mail: check this box to install the Thunderbird email client.
- MediaCenter: if you expand the ► you can select to install KODI and PlexHome Theater.
- Net: check this box to install the KRDC remote desktop client.
- Net-IM: check this box to install the Pidgin IRC client.
- Roles: if you expand the ► you can select to install the following installation roles: “Development”, “Internet”, “Media”, and “Office and Productivity”.
- Security: check this box to install the OpenVPN VPN client.
- SysUtils: check this box to install the PySalt distributed remote execution and configuration management system.
- Virtualization: if you expand the ► you can install VirtualBox Guest Additions and VMwareGuest.
- Web: if you expand the ► you can select to install the Chromium and Firefox web browsers. By default, Firefox is selected.
Once you have made your selection(s), click the “Save” button to save your selections. The “PC-BSD Package Selection” box will list the components that you selected for installation. You can now click the “Next” button to proceed to the next screen.
Note
if you are installing a desktop, the installer will display a pop-up message if it cannot find a physical or virtual disk that does not meet the recommended minimum size of 50GB. It will let you continue an installation on a smaller disk, but you may run into disk space issues on smaller disks.
3.3. Disk Selection Screen
The “Disk Selection” screen, seen in Figure 3.3a, summarizes the default disk configuration.
Figure 3.3a: Disk Selection Screen
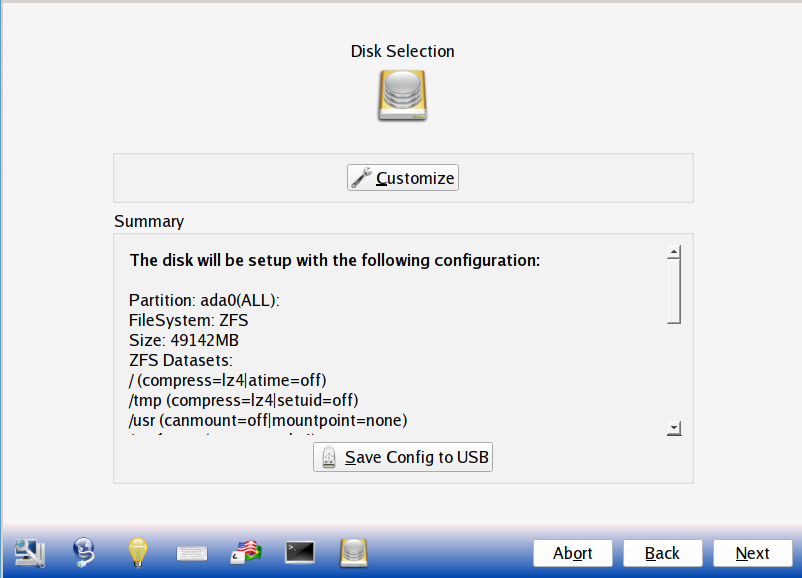
Warning
by default, PC-BSD® will assume that you wish to install on the entire first disk. If you are installing PC-BSD® as the only operating system on your computer, simply click “Next” to start the installation. However, if this is not your intent, review the rest of this section to determine how to layout your disk. If you plan on booting PC-BSD® with another operating system, you should also review the section on Dual Booting.
If you wish to select which disk or partition to install PC-BSD® into, click the “Customize” button to start the Disk Setup Wizard, shown in Figure 3.3b.
Figure 3.3b: Disk Setup Wizard
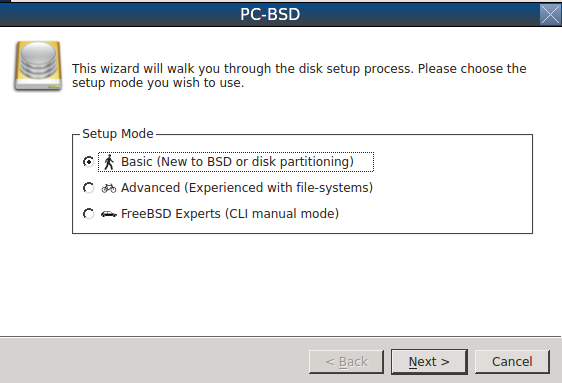
The wizard provides three modes of operation. The rest of this section describes these modes in detail.
- Basic: (default) select this mode if you wish to specify which partition or disk to install to.
- Advanced: select this mode if you wish to specify the installation partition or disk, use GPT partitioning, use a UEFI BIOS, force the block size, change the default ZFS pool name, specify the filesystem layout, add a log or cache device, or encrypt the disk.
- FreeBSD Expert: select this mode if you prefer to drop down to a shell to manually enter the commands to setup your disk.
Warning
regardless of the mode that you select, once the disk wizard completes and you click “Next” at the disk “Summary” screen, a pop-up window will ask if you would like to start the installation. Be sure to review the disk summary before clicking “Yes” and starting the installation. The disk “Summary” screen is your very last chance to make sure that you are ready. Once you click “Yes”, the selected hard drive or partition will be formatted and any data it contains will be lost.
Once you have finished configuring your disks, you can save the finished configuration to re-use it at a later time. Insert a FAT-formatted USB stick and click “Save Config to USB”.
3.3.1. Basic Mode
If you select “Basic” mode, the wizard will display the screen shown in Figure 3.3c.
Figure 3.3c: Select a Disk or Partition
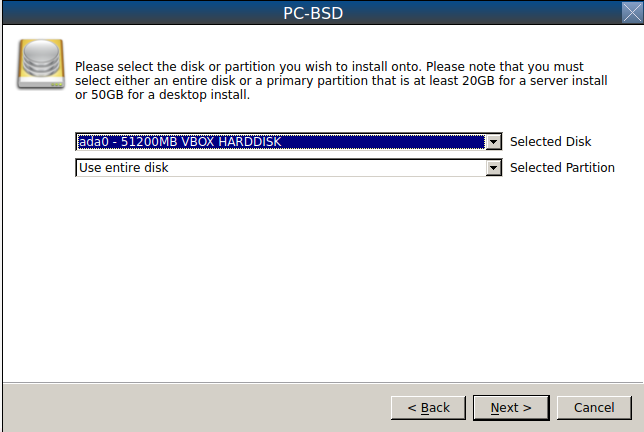
By default, the first hard disk will be selected. If you wish to install on a different disk, use the “Selected Disk” drop-down menu to select the disk to install into.
By default, the entire selected disk will be formatted. If the disk has been divided into partitions or you have an area of free space, use the “Selected Partition” drop-down menu to select the desired partition.
Note
PC-BSD® will only install into a primary partition, a GPT partition, or an area of free space. That is, you can not install PC-BSD® into a secondary or an extended partition. If you wish to create an area of free space to install into, refer to Creating Free Space for instructions.
Once you have selected the disk and partition, click “Next” to return to the disk “Summary” screen so that you can review your selections. If you wish to change anything, use the “Back” button to return to a previous screen. Otherwise, click “Finish” to leave the wizard. Click “Next” then “Yes” to start the installation.
3.3.2. Advanced Mode
If you select advanced mode, the wizard will display the screen shown in Figure 3.3d.
Figure 3.3d: Advanced Mode Options
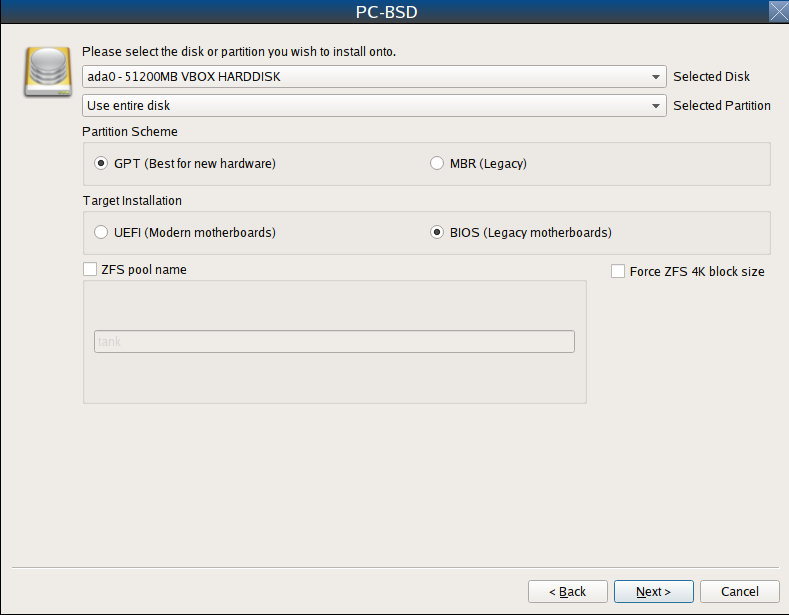
This screen provides the following options:
- Selected Disk: select the disk to install into.
- Selected Partition: select the desired partition or area of free space.
Note
PC-BSD® will only install into a primary partition, a GPT partition, or an area of free space. That is, you can not install PC-BSD® into a secondary or an extended partition. If you wish to create an area of free space to install into, refer to Creating Free Space for instructions.
- Partition Scheme: the default of “GPT (Best for new hardware)” is a partition table layout that supports larger partition sizes than the traditional “MBR (Legacy)” layout. If your installation disk/partition is larger than 2 TB, this option must be selected. Some older motherboards do not support this option. If the installation fails, try again with “MBR (Legacy)” selected. When in doubt, try the default selection first. Note that this section will not appear if you specify a partition rather than “Use entire disk” in the “Selected Partition” drop-down menu.
- Target Installation: when installing to non-UEFI systems, keep the default selection of “BIOS (Legacy motherboards)”. If the hardware supports UEFI, change the selection to “UEFI (Modern motherboards)”. Note that this section will not appear if you specify a partition rather than “Use entire disk” in the “Selected Partition” drop-down menu.
- Force ZFS 4k block size: this option should only be checked if you know for sure that the disk supports 4k, even though it lies and reports its size as 512b. Use with caution as it may cause the installation to fail.
- ZFS pool name: if you wish to use a pool name other than the default of tank, check this box and input the name of the pool.
After making your selections click “Next” to access the ZFS configuration screens. The rest of this section provides a ZFS overview and demonstrates how to customize the ZFS layout. Note that root is a reserved term and can not be used as a pool name.
3.3.2.1. ZFS Overview
ZFS is an enterprise grade file-system, which provides many features including: support for high storage capacities, high reliability, the ability to quickly take snapshots, boot environments, continuous integrity checking and automatic repair, RAIDZ which was designed to overcome the limitations of hardware RAID, and native NFSv4 ACLs.
If you are new to ZFS, the Wikipedia entry on ZFS provides an excellent starting point to learn about its features. These resources are also useful to bookmark and refer to as needed:
- ZFS Evil Tuning Guide
- FreeBSD ZFS Tuning Guide
- ZFS Best Practices Guide
- ZFS Administration Guide
- Becoming a ZFS Ninja (video)
- blog post explaining how ZFS simplifies the storage stack
The following is a glossary of terms used by ZFS:
Pool: a collection of devices that provides physical storage and data replication managed by ZFS. This pooled storage model eliminates the concept of volumes and the associated problems of partitions, provisioning, wasted bandwidth, and stranded storage. Thousands of filesystems can draw from a common storage pool, each one consuming only as much space as it actually needs. The combined I/O bandwidth of all devices in the pool is available to all filesystems at all times. The Storage Pools Recommendations of the ZFS Best Practices Guide provides detailed recommendations for creating the storage pool.
Mirror: a form of RAID where all data is mirrored onto two or more disks, creating a redundant copy should a disk fail.
RAIDZ: ZFS software solution that is equivalent to RAID5 in that it allows one disk to fail without losing data. Requires a minimum of 3 disks.
RAIDZ2: double-parity ZFS software solution that is similar to RAID6 in that it allows two disks to fail without losing data. Requires a minimum of 4 disks.
RAIDZ3: triple-parity ZFS software solution. RAIDZ3 offers three parity drives and can operate in degraded mode if up to three drives fail with no restrictions on which drives can fail.
Dataset: once a pool is created, it can be divided into datasets. A dataset is similar to a folder in that it supports permissions. A dataset is also similar to a filesystem in that you can set properties such as quotas and compression.
Snapshot: a read-only point-in-time copy of a filesystem. Snapshots can be created quickly and, if little data changes, new snapshots take up very little space. For example, a snapshot where no files have changed takes 0MB of storage, but if you change a 10GB file it will keep a copy of both the old and the new 10GB version. Snapshots provide a clever way of keeping a history of files, should you need to recover an older copy or even a deleted file. For this reason, many administrators take snapshots often (e.g. every 15 minutes), store them for a period of time (e.g. for a month), and store them on another system. Such a strategy allows the administrator to roll the system back to a specific time or, if there is a catastrophic loss, an off-site snapshot can restore the system up to the last snapshot interval (e.g. within 15 minutes of the data loss). Snapshots can be cloned or rolled back, but the files on the snapshot can not be accessed independently.
Clone: a writable copy of a snapshot which can only be created on the same ZFS volume. Clones provide an extremely space-efficient way to store many copies of mostly-shared data such as workspaces, software installations, and diskless clients. Clones do not inherit the properties of the parent dataset, but rather inherit the properties based on where the clone is created in the ZFS pool. Because a clone initially shares all its disk space with the original snapshot, its used property is initially zero. As changes are made to the clone, it uses more space.
ZIL: is effectively a filesystem journal that manages writes. The ZIL is a temporary storage area for sync writes until they are written asynchronously to the ZFS pool. If the system has many sync writes, such as from a database server, performance can be increased by adding a dedicated log device known as a SLOG (Secondary LOG). If the system has few sync writes, a SLOG will not speed up writes. When creating a dedicated log device, it is recommended to use a fast SSD with a supercapacitor or a bank of capacitors that can handle writing the contents of the SSD’s RAM to the SSD. If you decide to create a dedicated log device, the SSD should be half the size of system RAM as anything larger than that is unused capacity. Note that a dedicated log device can not be shared between ZFS pools and that the same device cannot hold both a log and a cache device.
L2ARC: ZFS uses a RAM cache to reduce read latency. If an SSD is dedicated as a cache device, it is known as an L2ARC and ZFS uses it to store more reads which can increase random read performance. However, adding a cache device will not improve a system with too little RAM and will actually decrease performance as ZFS uses RAM to track the contents of L2ARC. RAM is always faster than disks, so always add as much RAM as possible before determining if the system would benefit from a L2ARC device. If you have a lot of applications that do large amounts of random reads on a dataset small enough to fit into the L2ARC, read performance may be increased by adding a dedicated cache device. SSD cache devices only help if your working set is larger than system RAM, but small enough that a significant percentage of it will fit on the SSD. Note that a dedicated L2ARC device can not be shared between ZFS pools.
3.3.2.2. ZFS Layout
In “Advanced Mode”, the disk setup wizard allows you to configure your ZFS layout. The initial ZFS configuration screen is seen in Figure 3.3e.
Figure 3.3e: ZFS Configuration
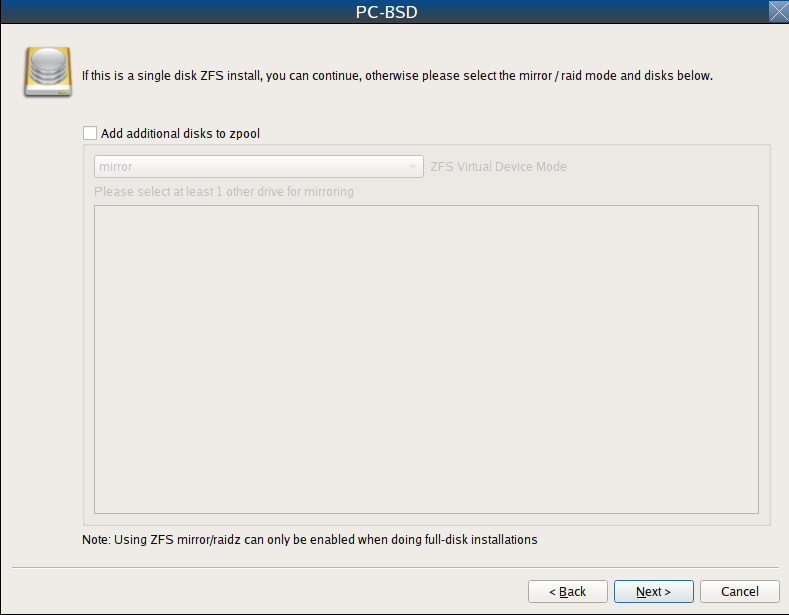
If your system contains multiple drives and you would like to use them to create a ZFS mirror or RAIDZ*, check the box “Add additional disks to zpool” which will enable this screen. Any available disks will be listed in the box below the “ZFS Virtual Device Mode” drop-down menu. Select the desired level of redundancy, then the desired number of disks.
Note
the PC-BSD® installer requires you to use entire disks (not partitions) when adding additional disks to the pool.
While ZFS will let you use disks of different sizes, this is discouraged as it will decrease storage capacity and ZFS performance.
The PC-BSD® installer supports the following ZFS configurations:
- mirror: requires a minimum of 2 disks.
- RAIDZ1: requires a minimum of 3 disks. For best performance, a maximum of 9 disks is recommended.
- RAIDZ2: requires a minimum of 4 disks. For best performance, a maximum of 10 disks is recommended.
- RAIDZ3: requires a minimum of 5 disks. For best performance, a maximum of 11 disks is recommended.
- stripe: requires a minimum of 2 disks. Note that a stripe does NOT provide ANY redundancy. If any disk fails in a stripe, all data in the pool is lost!
The installer will not let you save a configuration if your system does not meet the minimum number of disks required by that configuration. As you select a configuration, a message will indicate how many more disks you need to select.
To use multiple disks, select the type of configuration from the “ZFS Virtual Device Mode” drop-down menu, then check the box for each disk that you would like to add to that configuration. When finished, click the “Next” button to see the screen shown in Figure 3.3f.
Figure 3.3f: Add L2ARC or ZIL
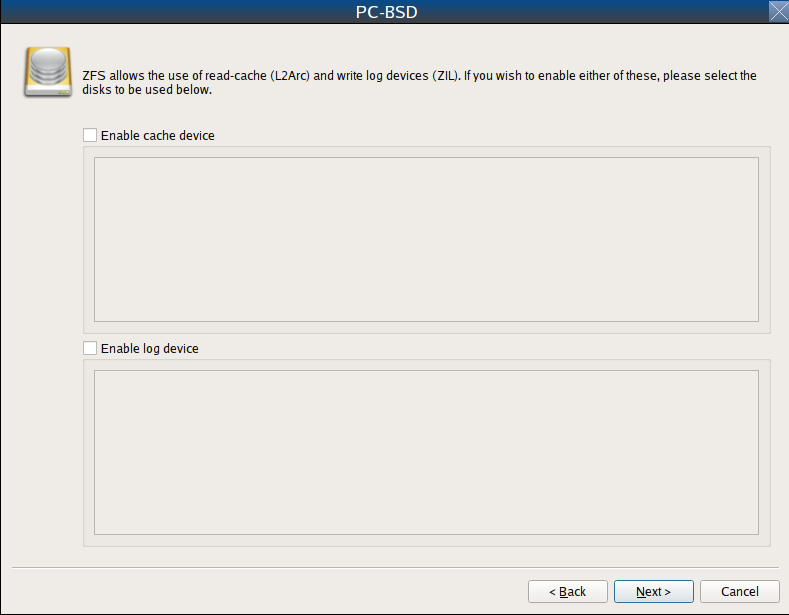
This screen can be used to specify an SSD to use as an L2ARC or a secondary log device. Any available devices will be listed in the boxes in this screen. Note that a separate SSD is needed for each type of device. Refer to the descriptions for ZIL and L2ARC in the ZFS Overview to determine if your system would benefit from any of these devices before adding them in this screen. When finished, click “Next” to see the screen shown in Figure 3.3g.
Figure 3.3g: Configure Encryption
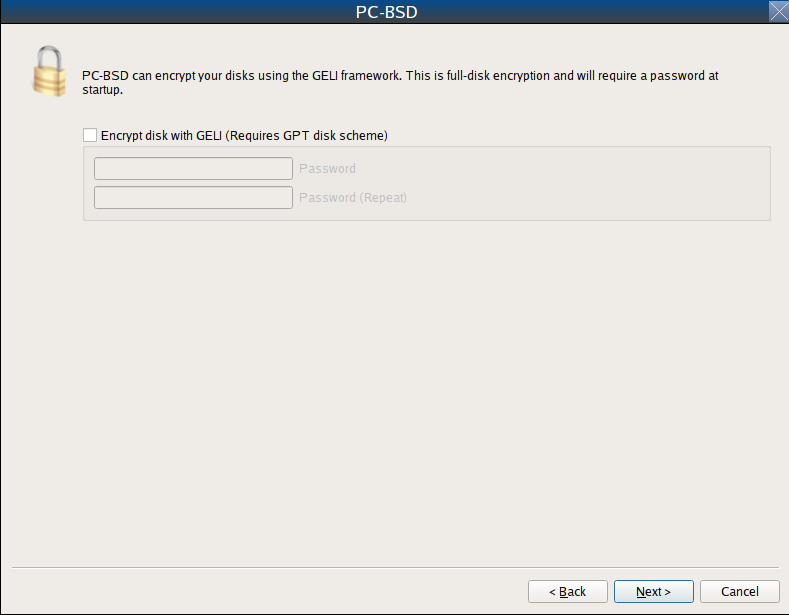
This screen can be used to configure full-disk encryption which is meant to protect the data on the disks should the system itself be lost or stolen. This type of encryption prevents the data on the disks from being available during bootup, unless the correct passphrase is typed at the bootup screen. Once the passphrase is accepted, the data is unencrypted and can easily be read from disk.
To configure full disk encryption, check the box “Encrypt disk with GELI”. This option will be greyed out if “GPT (Best for new hardware)” is not selected as GELI does not support MBR partitioning at this time. If needed, use the “Back” button to go back to the Advanced Mode screen and select the option “GPT (Best for new hardware)”. Once the “Encrypt disk with GELI” box is checked, input a good passphrase twice into the “Password” fields. This password should be long and something that you will not forget, but hard for other users, especially those who know you, to guess.
Warning
if you ever forget this passphrase, you will be unable to decrypt the disks and will lose access to their data!
When finished, click “Next” to move on the screen shown in Figure 3.3h.
Figure 3.3h: Default ZFS Layout
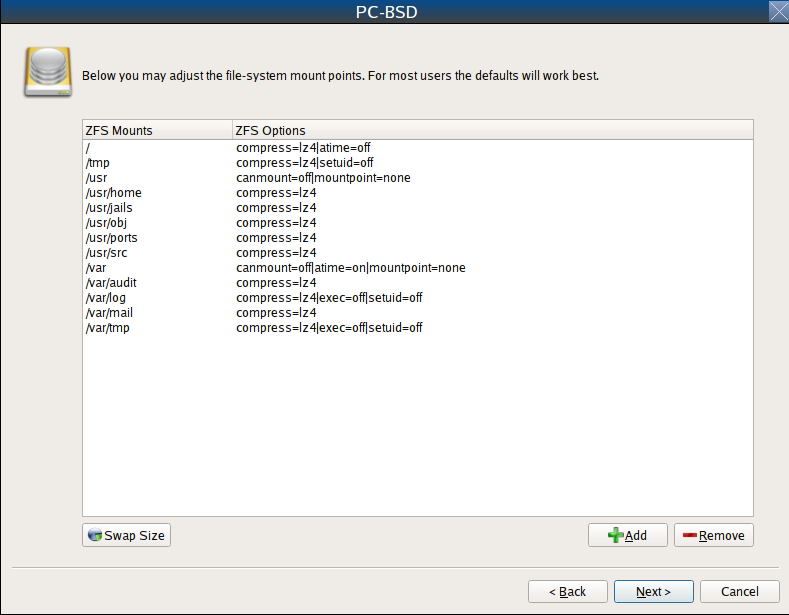
Regardless of how many disks you selected for your ZFS configuration, the default layout will be the same. ZFS does not require separate partitions for
/usr, /tmp, or /var. Instead, you create one ZFS partition (pool) and specify a mount for each dataset. A /boot partition is
not mandatory with ZFS as the PC-BSD® installer puts a 64k partition at the beginning of the drive.
Warning
do not remove any of the default mount points as they are used by PC-BSD®.
You can use the “Add” button to add additional mount points. You will only be prompted for the name of the mount point as size is not limited at creation time. Instead, the data on any mount point can continue to grow as long as space remains within the ZFS pool.
If you wish to set the swap size, click the “Swap Size” button. This will prompt you to enter a size in MB. If you have created a RAIDZ or mirror, a swap partition of the specified size will be created on each disk and mirrored between the drives. For example, if you specify a 2048MB swap size, a 2GB swap partition will be created on all of the specified disks, yet the total swap size will be 2GB, due to redundancy.
If you right-click any mount point, you can toggle between enabling or disabling any of the following ZFS properties.
- atime: when set to “on”, controls whether the access time for files is updated when they are read. When set to “off”, this property avoids producing write traffic when reading files and can result in significant performance gains, though it might confuse mailers and some other utilities.
- canmount: if set to “off”, the filesystem can not be mounted.
- checksum: automatically verifies the integrity of the data stored on disks. Setting this property to “off” is highly discouraged.
- compression: if set to “on”, automatically compresses stored data to conserve disk space.
- exec: if set to “off”, processes can not be executed from within this filesystem.
- setuid: if set to “on”, the set-UID bit is respected.
Once you click “Next”, the wizard will show a summary of your selections. If you wish to change anything, use the “Back” button to return to a previous screen. Otherwise, click “Finish” to leave the wizard and return to the “Disk Selection” screen.
3.3.3. FreeBSD Expert Mode
If you select FreeBSD expert mode, you will be prompted to launch a terminal where you can use command line utilities such as bsdinstall to manually configure the partitions. When you are finished, type exit to leave the terminal, then click “Next” to review the disk summary. If you wish to change anything, use the “Back” button to return to a previous screen. Otherwise, click “Finish” to leave the wizard and return to the “Disk Selection” screen.
3.4. Installation Progress Screen
Once you select “Yes” to start the installation, a progress screen, seen in Figure 3.4a, provides a progress bar and messages so that you can watch the installation’s progress.
Figure 3.4a: Installation Progress Screen

How long the installation takes depends upon the speed of your hardware, the installation type you selected, and the number of components to be installed. A typical installation takes between 15 and 30 minutes.
3.5. Installation Finished Screen
The screen shown in Figure 3.5a appears once the installation is complete.
Figure 3.5a: PC-BSD® Installation is Now Complete
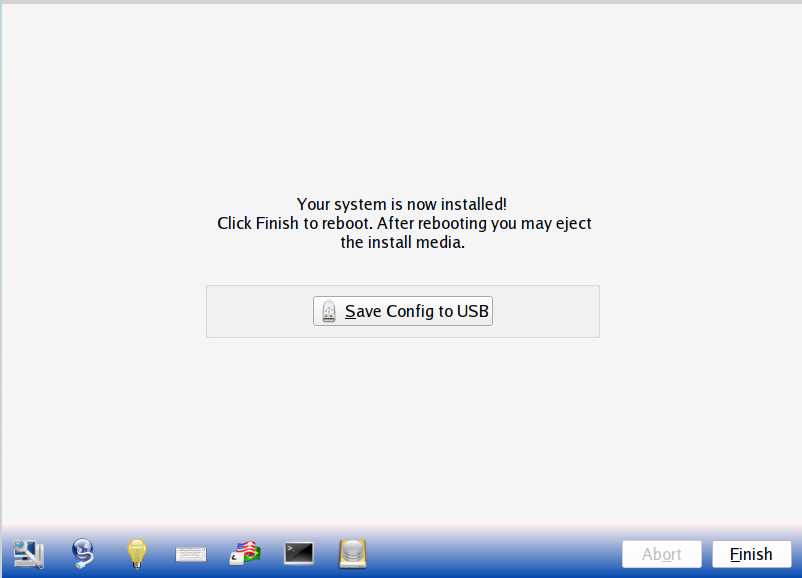
Click the “Finish” button to reboot into your PC-BSD® installation. Wait until the installer exits before removing the installation media.