10.3. File Formats
In the Save as.. dialog you can choose between various file formats. (see Figure 10-1)

Similarly, in the Import.. dialog you can also choose between various file formats. (see Figure 10-2)

Most of these formats are provided by plug-ins. If they don't appear on your list of available plug-ins use the Tools Plug-ins... menu item to verify that the appropriate plug-in has been loaded.
10.3.1. Gnumeric XML File Format
The default file format and Gnumeric's native format is an xml based file. The file format is a ascii text based xml format. It is however, typically written and read in a gzip compressed form.
The uncompressed format is human readable and designed to be easily parsed. It is very extensible.
10.3.2. Data Interchange Format
This format is supported by the "Data Interchange Format (DIF) module" plug-in.
 | This format is available when saving or importing files. |
10.3.3. DVI TeX Format
This format is supported by the "HTML & TeX" plug-in.
| This format is only available when saving files. |
Creation of a dvi file with Gnumeric requires that groff has been installed. If a complete TeX installation is available it is probably advisable to use the LaTeX format (Section 10.3.8) instead, since the created LaTeX file can be extensively customized before creating the dvi file from it.
10.3.4. MS Excel (tm) File Formats
This format is supported by the "MS Excel (tm) File Formats" plug-in.
Gnumeric can open files from most recent versions of MS Excel (tm). It can also save files in MS Excel (tm) 95 format.
10.3.5. Experimental Bonobo EFS Format
This format is supported by the "EXPERIMENTAL SAX based XML" plug-in.
| This format is available when importing or saving files. |
10.3.6. Gnome Glossary PO File Format
This format is supported by the "Gnome Glossary" plug-in.
| This format is only available when saving files. |
10.3.7. HTML File Formats
These formats are supported by the "HTML & TeX" plug-in.
10.3.7.1. HTML generated by Gnumeric
| This format is only available when importing or opening files. |
Very simple and well structured HTML tables can be opened by Gnumeric into an appropriate spreadsheet. In this process, Gnumeric will lose information on merged cells and most other formatting, but the main cell values should be preserved.
10.3.7.2. HTML 3.2 File Format
| This format is only available when saving files. |
Gnumeric can create HTML 3.2 files. All sheets of the current workbook are exported. The tables in the HTML 3.2 file contain all cells, whether visible or not, including merged cells and spans. Horizontal as well as vertical alignment is preserved, as are font colors and some font characteristics (italic, bold). These files also include an appropriate preamble.
10.3.7.3. HTML 4.0 File Format
| This format is only available when saving files. |
Gnumeric can create HTML 4.0 files. All sheets of the current workbook are exported. The tables in the HTML 4.0 file contain all cells, whether visible or not, including merged cells and spans. Horizontal as well as vertical alignment is preserved, as are some font characteristics (italic, bold) and cell background colors. These files also include an appropriate preamble.
10.3.7.4. HTML Fragment Format
| This format is only available when saving files. |
Gnumeric can create HTML fragments. All sheets of the current workbook are exported. The tables in such a fragment file contain all cells, whether visible or not, including merged cells and spans. Horizontal as well as vertical alignment is preserved, as are some font characteristics (italic, bold) as well as cell background and font colors. These files do not contain any preamble. Note that each tag used in these files is valid in some HTML version, the combination of these tags in a Gnumeric generated HTML fragment may not be.

10.3.8. LaTeX 2e Format
This format is supported by the "HTML & TeX" plug-in.
| This format is only available when saving files. |
Only the top sheet of the current workbook is exported.
The created LaTeX file can either be input into another LaTeX file (see Section 10.3.8.1) or latexed independently. See the content and Section 10.3.8.2 of the created file for various customization options.
Example 10-5. Saving as LaTeX file
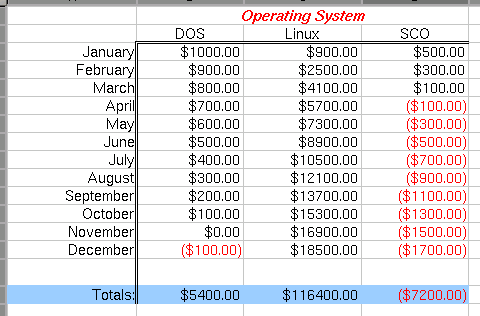
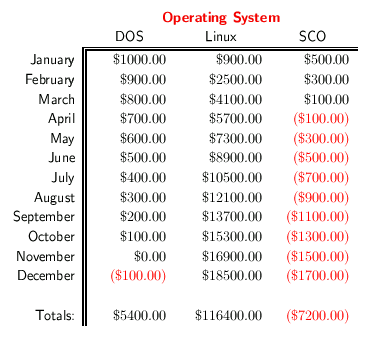
The screenshot Figure 10-3 shows an example Gnumeric file. If we save this file as LaTeX file, tex it using pdflatex and open it using xpdf we obtain Figure 10-8.
10.3.8.1. Including Tables Into Other Documents
To include an exported Gnumeric table into another LaTeX document you need to use several packages
        \usepackage{color}
        \usepackage{array}
        \usepackage{longtable}
        \usepackage{calc}
        \usepackage{multirow}
        \usepackage{hhline}
        \usepackage{ifthen}
and to add the following lines to the preamble of your document:
        \newlength{\gnumericTableWidth}
        \newlength{\gnumericTableWidthComplete}
When you have set up your main document in this way, include each table with:
\input{mygnumericfile.tex}
10.3.8.2. Customizing The LaTeX Tables
To switch from portrait to landscape for independently latexed tables, uncomment the line:
%,landscape%
to obtain
	\documentclass[12pt%
	                  ,landscape%
                    ]{report}
To change the column widths, look for the following section in the LaTeX file:
%%%%%%%%%%%%%%%%%%%%%%%%%%%%%%%%%%%%%%%%%%%%%%%%%%%%%%%%%%%%%%%%%%%%%%
%%                                                                  %%
%% The following are the widths of the various columns. We are      %%
%% defining them here because then they are easier to change.       %%
%% Depending on the cell formats we may use them more than once.    %%
%%                                                                  %%
%%%%%%%%%%%%%%%%%%%%%%%%%%%%%%%%%%%%%%%%%%%%%%%%%%%%%%%%%%%%%%%%%%%%%%

\def\gnumericColA{107pt*\gnumericScale}
\def\gnumericColB{89pt*\gnumericScale}
\def\gnumericColC{98pt*\gnumericScale}
\def\gnumericColD{89pt*\gnumericScale}
\def\gnumericColE{89pt*\gnumericScale}
To change the second column (Column B) to a width of 0.75 inches, we would simply have to modify this code to:
\def\gnumericColA{107pt*\gnumericScale}
\def\gnumericColB{0.75in}
\def\gnumericColC{98pt*\gnumericScale}
\def\gnumericColD{89pt*\gnumericScale}
\def\gnumericColE{89pt*\gnumericScale}
10.3.9. Linear and Integer Program File Format
This format is supported by the "Linear and integer expression (MPS) format module" plug-in.
| This format is only available when importing files. |
10.3.10. Plan Perfect Format
This format is supported by the "Plan Perfect" plug-in.
| This format is only available when importing files. |
10.3.11. PDF Format
Currently, Gnumeric cannot save directly as a PDF file; but, provided a standard tetex installation is available, the Gnumeric file can be saved as a LaTeX file (see Section 10.3.8), and turned into a PDF file using pdflatex.
See Figure 10-8 for an example of a created PDF file.
10.3.12. SC/XSpread Format
This format is supported by the "SC/XSpread Format" plug-in.
| This format is only available when importing files. |
10.3.13. Text Format
This format exports Gnumeric spreadsheets as straight text or imports them from straight text files. Both export (save as) as well as import can be highly customized.
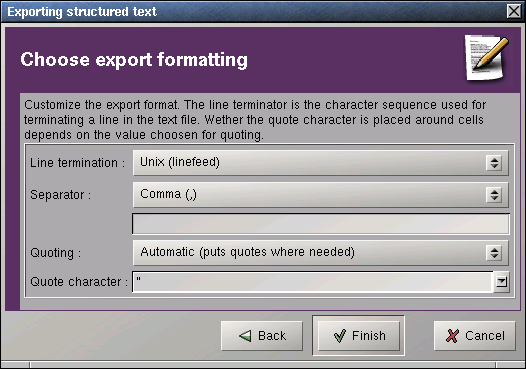
10.3.13.1. The Text Export Druid
After specifying the "Text File Export" Format and a file name in the "Save as.." dialog, the text export druid starts to guide you through the various options:
Specify which sheets to export.
Choose the line terminator to use. You should select it based on the platform you want the created file to be used on. Choose one of several field separators and whether to quote all fields or only as needed. The defaults create the standard Unix csv format.
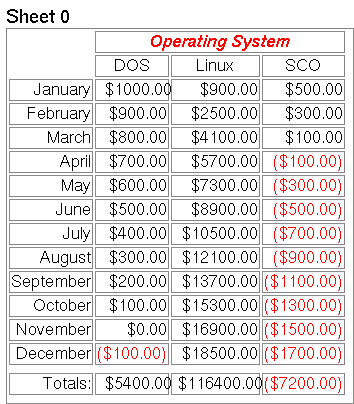
Select "Finish" to finally export the selected sheets and create the text file. The standard csv output of Figure 10-3 is shown in Figure 10-11.

10.3.13.2. The Text Import Druid
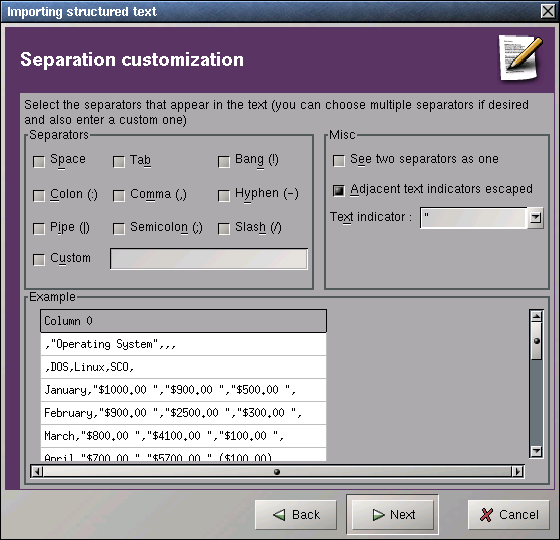
After specifying the "Text File Import" Format and a file name in the "Import.." dialog, the text import druid starts to guide you through the various options.
On the first screen of the druid specify the basic format type (fixed width fields or fields separated by specific characters), as well as the line numbers of the lines to import.

10.3.13.2.1. The Text Import Druid for Separated Fields
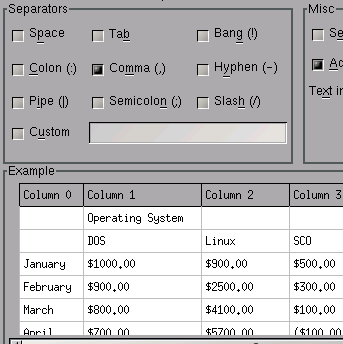
Select the appropriate field separator(s) in the "Separator" frame. Select the "See two separators as one"option if any sequence of separators are supposed to be considered a single separator. The "Example" frame gives immediate feedback on your choices:
Finally select the appropriate format for each input column:
After selecting a column on the left select the appropriate format on the right. In the preview section at the bottom of the dialog, you can immediately see the effect of selecting that format. The following types of formats are available:
- General
This format will guess for each field value whether it is text, a number, a date, etc.
- Numbers
You can choose between various number formats. The following list presents just a short selection of those formats:
There are also formats facilitating the use of scientific notation, see Figure 10-21.
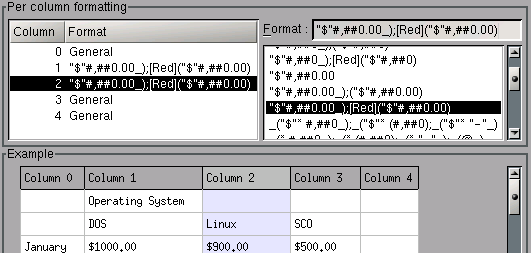
- Currency Amounts
You can choose between various currency formats. The following list presents just a short selection of those formats:
- Dates and Times
You can choose between various date and time formats. Some of these formats will recognize combined date/time entries. The following list presents just a short selection of those formats:
- Percentages
You can choose between various formats that recognize percentages. The following list presents just a short selection of those formats:
- Fractions
You can choose between a few formats that recognize fractions. The following list presents just a short selection of those formats:
- Scientific Notation
You can choose between a few formats that recognize numbers in scientific notation.. The following list presents just a short selection of those formats:
- Text
If you want the importer to simply read the field value as text without attempting to interpret it in any way, use the following text format:
More details on the various formats can be found in Section 9.1.1.
Click the "Finish" button to complete importing the file.
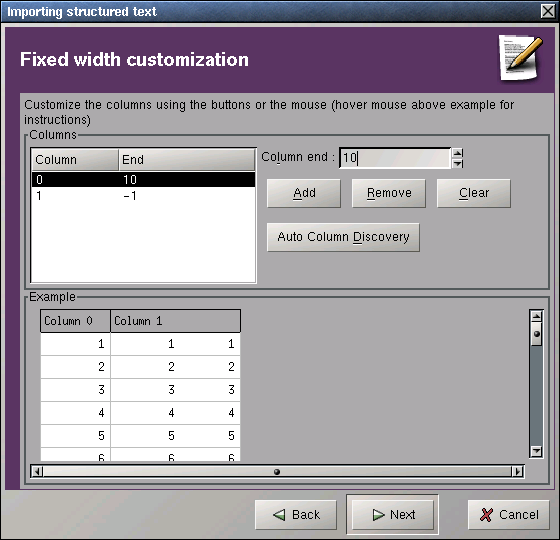
10.3.13.2.2. The Text Import Druid for Fixed Width Fields
If you selected fixed width fields you are asked to specify the widths for each field. Click the "Auto Column Discovery" button to have Gnumeric try to determine the fields widths automatically.
Finally select the appropriate format for each input column as in Figure 10-15.
Click the "Finish" button to complete importing the file.
10.3.14. TROFF Format
This format is supported by the "HTML & TeX" plug-in.
| This format is only available when saving files. |
Files in this format are useful because they can be converted with the groff or troff commands into various other common formats. For example, given a TROFF file myfile.me, the command
groff -me -t -Tps myfile.me >myfile.ps
will create a postscript file of the corresponding table.
Similarly, the command
groff -me -t -Tascii myfile.me >myfile.ascii
creates an ascii (straight text) file.
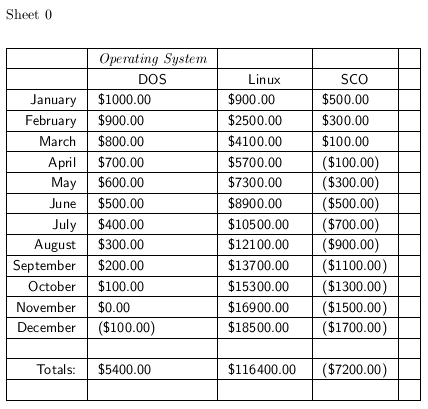
Example 10-6. Creating an ASCII File
If we save Figure 10-3 as a troff file hypothetical-sales.me and then execute the command
groff -me -t -Tascii hypothetical-sales.me >hypothetical-sales.ascii
then the file hypothetical-sales.ascii contains:
Sheet 0


+----------+------------------+-------------+------------+---+
|          | Operating System |             |            |   |
+----------+------------------+-------------+------------+---+
|          |       DOS        |    Linux    |    SCO     |   |
+----------+------------------+-------------+------------+---+
|  January | $1000.00         | $900.00     | $500.00    |   |
+----------+------------------+-------------+------------+---+
| February | $900.00          | $2500.00    | $300.00    |   |
+----------+------------------+-------------+------------+---+
|    March | $800.00          | $4100.00    | $100.00    |   |
+----------+------------------+-------------+------------+---+
|    April | $700.00          | $5700.00    | ($100.00)  |   |
+----------+------------------+-------------+------------+---+
|      May | $600.00          | $7300.00    | ($300.00)  |   |
+----------+------------------+-------------+------------+---+
|     June | $500.00          | $8900.00    | ($500.00)  |   |
+----------+------------------+-------------+------------+---+
|     July | $400.00          | $10500.00   | ($700.00)  |   |
+----------+------------------+-------------+------------+---+
|   August | $300.00          | $12100.00   | ($900.00)  |   |
+----------+------------------+-------------+------------+---+
|September | $200.00          | $13700.00   | ($1100.00) |   |
+----------+------------------+-------------+------------+---+
|  October | $100.00          | $15300.00   | ($1300.00) |   |
+----------+------------------+-------------+------------+---+
| November | $0.00            | $16900.00   | ($1500.00) |   |
+----------+------------------+-------------+------------+---+
| December | ($100.00)        | $18500.00   | ($1700.00) |   |
+----------+------------------+-------------+------------+---+
|          |                  |             |            |   |
+----------+------------------+-------------+------------+---+
|  Totals: | $5400.00         | $116400.00  | ($7200.00) |   |
+----------+------------------+-------------+------------+---+
|          |                  |             |            |   |
+----------+------------------+-------------+------------+---+


                              1